
Once you have configured user objects, and users are authenticating against those accounts, you expose yourself to two additional challenges: security vulnerabilities, which if unaddressed could compromise the integrity of your enterprise network; and social engineering challenges, as you work to make the network and authentication in general, friendly and reliable for users. Unfortunately, these two dynamics are at odds with each other—the more secure a network, the less usable it becomes. In this topic, we will address issues related to user authentication. You will learn the impact of domain account policies, including password policies and account lockout policies. You will also learn how to configure auditing for logon-related events, and to perform various authentication-related tasks on user objects.
Securing Authentication with Policy
Active Directory on Windows Server 2003 supports security policies to strengthen pass-words and their use within an enterprise. Of course, you must design a password policy that is sufficiently daunting to attackers while being sufficiently convenient for users, so that they do not forget passwords (resulting in increased calls to the help desk) or, worse, write down their passwords.
A system running Windows Server 2003 as a member server maintains a policy related to its local user accounts. The local security policy can be managed using the appropriately named snap-in: Local Security Policy.
You will more often be concerned with the policy that affects domain user objects. Domain account policy is managed by the Default Domain Policy. To examine and modify this policy, open Active Directory Users and Computers. Select the domain node and choose Properties from the Action menu. Click the Group Policy tab. The GPO listed as the first, or top object link is the policy object that will drive the domain account policies. It is typically, and in best practice, the Default Domain Policy. Select that policy and click Edit. The Group Policy Object Editor console opens, focused on the Default Domain policy. Navigate to Computer Configuration, Windows Settings, Security Settings, Account Policies.
Password Policy
The domain password policies enable you to protect your network against password compromise by enforcing best-practice password management techniques. The policies are described in below Table
Enforce Password History: When this policy is enabled, Active Directory maintains a list of recently used passwords, and will not allow a user to create a password that matches a password in that history. The result is that a user, when prompted to change his or her password, cannot use the same password again, and therefore cannot circumvent the password lifetime. The policy is enabled by default, with the maximum value of 24. Many IT organizations use a value of 6 to 12.
Maximum Password Age: This policy determines when users will be forced to change their passwords. Passwords that are unchanged or infrequently changed are more vulnerable to being cracked and utilized by attackers to impersonate a valid account. The default value is 42days. IT organizations typically enforce password changes every 30 to 90 days.
Minimum Password Age: When users are required to change their passwords—even when a password history is enforced—they can simply change their passwords several times in a row to circumvent password requirements and return to their original passwords. The Minimum Password Age policy prevents this possibility by requiring that a specified number of days must pass between password changes. Of course, a password can be reset at any time in Active Directory by an administrator or support person with sufficient permissions. But the user cannot change their password more than once during the time period specified by this setting.
Minimum Password Length: This policy specifies the minimum number of characters required in a password. The default in Windows Server 2003 is seven
Passwords Must Meet Complexity Requirements: This policy enforces rules, or filters, on new passwords. The default password filter in Windows Server 2003 (passfilt.dll) requires that a password:
* Is not based on the user’s account name.
* Is at least six characters long.
* Contains characters from three of the following four character types:
1. Uppercase alphabet characters (A…Z)
2. Lowercase alphabet characters (a…z)
3. Arabic numerals (0…9)
4. Non alphanumeric characters (for example, !$#,%)
Windows Server 2003 enables this policy, by default.
Account Lockout Policy
Account lockout refers, in its broadest sense, to the concept that after several failed logon attempts by a single user, the system should assume that an attacker is attempting to compromise the account by discovering its password and, in defense, should lock the account so no further logons may be attempted. Domain account lockout policies determine the limitations for invalid logons, expressed in a number of invalid logons in a period of time, and the requirements for an account to become unlocked, whether by simply waiting or contacting an administrator. Below Table summarizes Account Lockout policies.
Account Lockout Threshold: This policy configures the number of invalid logon attempts that will trigger account lockout. The value can be in the range of 0 to 999. A value that is too low (as few as three, for example) may cause lockouts due to normal, human error at logon. A value of 0 will result in accounts never being locked out.
The lockout counter is not affected by logons to locked workstations.
Account Lockout Duration: This policy determines the period of time that must pass after a lockout
before Active Directory will automatically unlock a user’s account. The policy is not set by default, as it is useful only in conjunction with the Account Lockout Threshold policy. Although the policy accepts values ranging from 0 to 99999 minutes, or about 10 weeks, a low setting (5 to 15 minutes) is sufficient to reduce attacks significantly without unreason-ably affecting legitimate users who are mistakenly locked out. A value of 0 will require the user to contact appropriate administrators to unlock the account manually.
Reset Account Lockout Counter After: This setting specifies the time that must pass after an invalid logon attempt before the counter resets to zero. The range is 1 to 99999 minutes, and must be less than or equal to the account lockout duration.
Auditing Authentication
If you are concerned that attacks may be taking place to discover user passwords, or to troubleshoot authentication problems, you can configure an auditing policy that will create entries in the Security log that may prove illuminating.
Audit Policies
The following policies are located in the Computer Configuration, Windows Settings, Security Settings, Local Policies, Audit Policy node of Group Policy Object Editor (or the Local Security Policy snap-in). You can configure auditing for successful or failed events.
*Audit Account Logon Events This policy audits each instance of user logon that involves domain controller authentication. For domain controllers, this policy is defined in the Default Domain Controllers GPO. Note, first, that this policy will create a Security log entry on a domain controller each time a user logs on inter-actively or over the network using a domain account. Second, remember that to evaluate fully the results of the auditing, you must examine the Security logs on all domain controllers, because user authentication is distributed among each domain controller in a site or domain.
*Audit Account Management Configures auditing of activities including the creation, deletion, or modification of user, group, or computer accounts. Password resets are also logged when account management auditing is enabled.
*Audit Logon Events Logon events include logon and logoff, interactively or through network connection. If you have enabled Audit Account Logon Events policy for successes on a domain controller, workstation logons will not generate logon audits. Only interactive and network logons to the domain controller itself generate logon events. Account logon events are generated on the local computer for local accounts and on the domain controller for network accounts. Logon events are generated wherever the logon occurs.
Security Event Log
Once you have configured auditing, the security logs will begin to fill with event messages. You can view these messages by selecting Security from the Event Viewer snap-in, and then double-clicking the event.
Administering User Authentication
When users forget their passwords, are transferred or terminated, you will have to manage their user objects appropriately. The most common administrative tasks related to user account security are unlocking an account, resetting a password, disabling, enabling, renaming, and deleting user objects.
Unlocking a User Account
The account lockout policy requires that when a user has exceeded the limit for invalid logon attempts, the account is locked and no further logons can be attempted for a specified period of time, or until an administrator has unlocked the account.
To unlock a user, select the user object and, from the Action menu, choose Properties. Click the Account tab and clear the check box: Account Is Locked Out.
Resetting User Passwords
If a user forgets his or her password, you must reset the password. You do not need to know the user’s old password to do so. Simply select the user object and, from the Action menu, choose the Reset Password command. Enter the new password twice to confirm the change, and as a security best practice, select the User Must Change Pass-word At Next Logon option.
Disabling, Enabling, Renaming, and Deleting User Objects
Personnel changes may require you to disable, enable, or rename a user object. The process for doing so is similar for each action. Select the user and, from the Action menu, choose the appropriate command, as follows:
*Disabling And Enabling A User When a user does not require access to the network for an extended period of time, you should disable the account. Re-enable the account when the user needs to log on once again. Note that the only one of the commands to Disable or Enable will appear on the Action menu depending on the current status of the object.
*Deleting A User When a user is no longer part of your organization, and there will not soon be a replacement, delete the user object. Remember that by deleting a user, you lose its group memberships and, by deleting the SID, its rights and per-missions. If you recreate a user object with the same name, it will have a different SID, and you will have to reassign rights, permissions, and group memberships.
*Renaming A User You will rename a user if a user changes their name, for example through marriage, or in the event that a user is no longer part of your organization, but you are replacing that user and you want to maintain the rights, permissions, group memberships, and most of the user properties of the previous user.
Thursday, December 24, 2009


Monday, December 21, 2009
Managing User Profiles
You probably wouldn’t read this Blog if you weren’t supporting users, and you know that there are elements of the user’s system that cause the user pain when they are not present. For example, if a user logs on and does not have access to his or her Internet Explorer Favorites, or must reconfigure his or her custom dictionary, or does not see familiar shortcuts or documents on the desktop, the user’s productivity takes an instant plunge, and the help desk gets a call. Each of these examples relate to components of the user profile. Profiles can be configured to enhance their availability, security, and reliability. In this Topic, you will learn how to manage local, roaming, group, and mandatory profiles.
User Profiles
A user profile is a collection of folders and data files that contain the elements of your desktop environment that make it uniquely yours. Settings include:
*Shortcuts in your Start menu, on your desktop, and in your Quick Launch bar
*Documents on your desktop and, unless redirection is configured, in your My Documents folder
*Internet Explorer favorites and cookies
*Certificates (if implemented)
*Application specific files, such as the Microsoft Office custom user dictionary, user templates, and auto complete list
*My Network Places
*Desktop display settings, such as appearance, wallpaper, and screensaver
These important elements are specific to each user. It is desirable that they are consistent between logons, available should the user need to log on to another system, and resilient in the event that the user’s system fails and must be reinstalled.
Local User Profiles
By default, user profiles are stored locally on the system in the %Systemdrive% \Documents and Settings\%Username% folder. They operate in the following manner:
*When a user logs on to a system for the first time, the system creates a profile for the user by copying the Default User profile. The new profile folder is named based on the logon name specified in the user’s initial logon.
*All changes made to the user’s desktop and software environment are stored in the local user profile. Each user has their individual profiles, so settings are user-specific.
*The user environment is extended by the All Users profile, which can include shortcuts in the desktop or start menu, network places, and even application data. Elements of the All Users profile are combined with the user’s profile to create the user environment. By default, only users of the Administrators group can modify the All Users profile.
*The profile is truly local. If a user logs on to another system, the documents and settings that are part of their profile do not follow the user. Instead, the new system behaves as outlined here, generating a new local profile for the user if it is the user’s first time logging on to that system.
Roaming User Profiles
If users work at more than one computer, you can configure roaming user profiles (RUPs) to ensure that their documents and settings are consistent no matter where they log on. RUPs store the profile on a server, which also means that the profiles can be backed up, scanned for viruses, and controlled centrally. Even in environments where users do not roam, RUPs provide resiliency for the important information stored in the profile. If a user’s system fails and must be reinstalled, an RUP will ensure that the user’s environment is identical on the new system to the one on the previous system.
To configure an RUP, create a shared folder on a server. Ideally, the server should be a file server that is frequently backed up.
On the Profile tab of the user’s Properties dialog box, type the Profile Path in the format: \\server \share\%Username%. The %Username variable will automatically be replaced with the user’s logon name.
It’s that simple. The next time the user logs on, the system will identify the roaming profile location.
When the user logs off, the sytem will upload the profile to the profile server. The user can now log on to that system or any other system in the domain, and the documents and settings that are part of the RUP will be applied.
When a user with an RUP logs on to a new system for the first time, the system does not copy its Default User profile. Instead, it downloads the RUP from the network location. When a user logs off, or when a user logs on to a system on which they’ve worked before, the system copies only files that have changed.
Creating a Preconfigured User Profile
You can create a customized user profile to provide a planned, preconfigured desktop and software environment. This is helpful to achieve the following:
*Provide a productive work environment with easy access to needed network resources and applications
*Remove access to unnecessary resources and applications
*Simplify help desk troubleshooting by enforcing a more straightforward and consistent desktop
No special tools are required to create a preconfigured user profile. Simply log on to a system and modify the desktop and software settings appropriately. It’s a good idea to do this as an account other than your actual user account so that you don’t modify your own profile unnecessarily.
Once you’ve created the profile, log on to the system with administrative credentials. Open System from Control Panel, click the Advanced tab, and then click Settings in the User Profiles frame. Select the profile you created, and then click Copy To. Type the Universal Naming Convention (UNC) path to the profile in the format: \\server\share\username. In the Permitted To Use section, click Change to select the user for whom you’ve configured the profile. This sets the ACL on the profile folder to allow access to that user. Below Figure shows an example. Click OK and the pro-file is copied to the network location.

Finally, open the properties of the user object and, on the Profile tab, enter the same UNC Profile Path field. The next time that user logs on to a domain computer, that profile will be downloaded and will determine his or her user environment.
Creating a Preconfigured Group Profile
Roaming profiles enable you to create a standard desktop environment for multiple users with similar job responsibilities. The process is similar to creating a preconfigured user profile except that the resulting profile is made available to multiple users.
Create a profile using the steps outlined above. When copying the profile to the server, use a path such as: \\server\share\group profile name.
After copying the profile to the network, you must configure the profile path for the users to whom the profile will apply. Windows Server 2003 simplifies this task, in that you can multiselect users and change the profile path for all users simultaneously. Type the same UNC that you used to copy the profile to the network, for example, \\server\share\group profile name.
Finally, because more than one user will be accessing a group profile, you must make a group profile mandatory, as described in the following section.
Configuring a Mandatory Profile
A mandatory profile does not allow users to modify the profile’s environment. More specifically, a mandatory profile does not maintain changes between sessions. There-fore, although a user can make changes, the next time the user logs on, the desktop will look the same as the last time he or she logged on. Changes do not persist.
Mandatory profiles can be helpful in situations in which you want to lock down the desktop. They are, in a practical sense, critical when you implement group profiles because you obviously don’t want the changes one user makes to affect the environ¬ments of other users.
To configure a profile as mandatory, simply rename a file in the root folder of the pro-file. Interestingly, mandatory profiles are not configured through the application of per-missions. The file you need to rename is Ntuser.dat. It is a hidden file, so you must ensure that you have specified to “Show hidden files and folders” in the Folder Options program in Control Panel, or use attrib from the command-line to remove the Hidden attribute. You may also need to configure Windows Explorer to display file extensions.
Locate the Ntuser.dat file in the profile you wish to make mandatory. Rename the file to Ntuser.man. The profile, whether romaing or local is now mandatory
User Profiles
A user profile is a collection of folders and data files that contain the elements of your desktop environment that make it uniquely yours. Settings include:
*Shortcuts in your Start menu, on your desktop, and in your Quick Launch bar
*Documents on your desktop and, unless redirection is configured, in your My Documents folder
*Internet Explorer favorites and cookies
*Certificates (if implemented)
*Application specific files, such as the Microsoft Office custom user dictionary, user templates, and auto complete list
*My Network Places
*Desktop display settings, such as appearance, wallpaper, and screensaver
These important elements are specific to each user. It is desirable that they are consistent between logons, available should the user need to log on to another system, and resilient in the event that the user’s system fails and must be reinstalled.
Local User Profiles
By default, user profiles are stored locally on the system in the %Systemdrive% \Documents and Settings\%Username% folder. They operate in the following manner:
*When a user logs on to a system for the first time, the system creates a profile for the user by copying the Default User profile. The new profile folder is named based on the logon name specified in the user’s initial logon.
*All changes made to the user’s desktop and software environment are stored in the local user profile. Each user has their individual profiles, so settings are user-specific.
*The user environment is extended by the All Users profile, which can include shortcuts in the desktop or start menu, network places, and even application data. Elements of the All Users profile are combined with the user’s profile to create the user environment. By default, only users of the Administrators group can modify the All Users profile.
*The profile is truly local. If a user logs on to another system, the documents and settings that are part of their profile do not follow the user. Instead, the new system behaves as outlined here, generating a new local profile for the user if it is the user’s first time logging on to that system.
Roaming User Profiles
If users work at more than one computer, you can configure roaming user profiles (RUPs) to ensure that their documents and settings are consistent no matter where they log on. RUPs store the profile on a server, which also means that the profiles can be backed up, scanned for viruses, and controlled centrally. Even in environments where users do not roam, RUPs provide resiliency for the important information stored in the profile. If a user’s system fails and must be reinstalled, an RUP will ensure that the user’s environment is identical on the new system to the one on the previous system.
To configure an RUP, create a shared folder on a server. Ideally, the server should be a file server that is frequently backed up.
On the Profile tab of the user’s Properties dialog box, type the Profile Path in the format: \\server \share\%Username%. The %Username variable will automatically be replaced with the user’s logon name.
It’s that simple. The next time the user logs on, the system will identify the roaming profile location.
When the user logs off, the sytem will upload the profile to the profile server. The user can now log on to that system or any other system in the domain, and the documents and settings that are part of the RUP will be applied.
When a user with an RUP logs on to a new system for the first time, the system does not copy its Default User profile. Instead, it downloads the RUP from the network location. When a user logs off, or when a user logs on to a system on which they’ve worked before, the system copies only files that have changed.
Creating a Preconfigured User Profile
You can create a customized user profile to provide a planned, preconfigured desktop and software environment. This is helpful to achieve the following:
*Provide a productive work environment with easy access to needed network resources and applications
*Remove access to unnecessary resources and applications
*Simplify help desk troubleshooting by enforcing a more straightforward and consistent desktop
No special tools are required to create a preconfigured user profile. Simply log on to a system and modify the desktop and software settings appropriately. It’s a good idea to do this as an account other than your actual user account so that you don’t modify your own profile unnecessarily.
Once you’ve created the profile, log on to the system with administrative credentials. Open System from Control Panel, click the Advanced tab, and then click Settings in the User Profiles frame. Select the profile you created, and then click Copy To. Type the Universal Naming Convention (UNC) path to the profile in the format: \\server\share\username

Creating a Preconfigured Group Profile
Roaming profiles enable you to create a standard desktop environment for multiple users with similar job responsibilities. The process is similar to creating a preconfigured user profile except that the resulting profile is made available to multiple users.
Create a profile using the steps outlined above. When copying the profile to the server, use a path such as: \\server\share\group profile name.
After copying the profile to the network, you must configure the profile path for the users to whom the profile will apply. Windows Server 2003 simplifies this task, in that you can multiselect users and change the profile path for all users simultaneously. Type the same UNC that you used to copy the profile to the network, for example, \\server\share\group profile name.
Finally, because more than one user will be accessing a group profile, you must make a group profile mandatory, as described in the following section.
Configuring a Mandatory Profile
A mandatory profile does not allow users to modify the profile’s environment. More specifically, a mandatory profile does not maintain changes between sessions. There-fore, although a user can make changes, the next time the user logs on, the desktop will look the same as the last time he or she logged on. Changes do not persist.
Mandatory profiles can be helpful in situations in which you want to lock down the desktop. They are, in a practical sense, critical when you implement group profiles because you obviously don’t want the changes one user makes to affect the environ¬ments of other users.
To configure a profile as mandatory, simply rename a file in the root folder of the pro-file. Interestingly, mandatory profiles are not configured through the application of per-missions. The file you need to rename is Ntuser.dat. It is a hidden file, so you must ensure that you have specified to “Show hidden files and folders” in the Folder Options program in Control Panel, or use attrib from the command-line to remove the Hidden attribute. You may also need to configure Windows Explorer to display file extensions.
Locate the Ntuser.dat file in the profile you wish to make mandatory. Rename the file to Ntuser.man. The profile, whether romaing or local is now mandatory
Creating Multiple User Objects
Occasionally, situations emerge that require you to create multiple user objects quickly, such as a new class of incoming students at a Institute or a group of new hires at an organization. In these situations you must know how to facilitate or automate user object creation effectively so that you do not approach the task on an account-by-account basis. In topic Creating and Managing User Objects, you learned how to create and manage user objects with Active Directory Users and Computers. This topic will extend those concepts, skills, and tools to include user object creation through template objects, imported objects, and command-line scripting of objects.
Creating and Utilizing User Object Templates
It is common for objects to share similar properties. For example, all sales representatives may belong to the same security groups, are allowed to log on to the network during the same hours, and have home folders and roaming profiles on the same server. In such cases, it is helpful when creating a user object for that object to be pre-populated with common properties. This can be accomplished by creating a generic user object—often called a template—and then copying that object to create new users.
To generate a user template, create a user and populate its properties. Put the user into appropriate groups.
To create a user based on the template, select the template and choose Copy from the Action menu. You will be prompted for properties similar to those when you created a new user: first and last name, initials, logon names, password, and account options. When the object is created, you will find that properties are copied from the template based on the following property-page-based description:
*General: No properties copied
*Address: All properties except Street address are copied
*Account: All properties are copied, except for logon names, which you are prompted to enter when copying the template
*Profile: All properties are copied, and the profile and home-folder paths are modified to reflect the new user’s logon name
*Telephones: No properties are copied
*Organization: All properties are copied, except for Title
*Member Of: All properties are copied
* Dial-in, Environment, Sessions, Remote Control, Terminal Services Profile, COM+: No properties are copied
Importing User Objects Using CSVDE
CSVDE is a command-line utility that allows you to import or export objects in Active Directory from (or to) a comma-delimited text file (also known as a comma-separated value text file), which is, of course, a common format easily read in Notepad and Microsoft Excel. The command is a powerful way to generate objects quickly. The command’s basic syntax is
csvde [-i] [-f FileName] [-k]
-i: Specifies import mode. If not specified, the default mode is export.
-f: FileName: Identifies the import file name.
-k: Ignores errors including “object already exists,” “constraint violation,” and “attribute or value already exists” during the import operation and continues processing.
The import file itself is a comma-delimited text file (*.csv or *.txt), in which the first line is a list of Lightweight Directory Access Protocol (LDAP) attribute names for the attributes imported, followed by one line for each object. Each object must contain exactly the attributes listed on the first line. A sample file follows:
DN,objectClass,sAMAccountName,sn,givenName,userPrincipalName
"CN=Prashant Pandey,OU=Employees,DC=mcseweb,DC=com", user,ppandey,pandey,prashant,prashant.pandey@mcseweb.com
This file, when imported, would create a user object in the Employees OU called Scott Bishop. The logon names, first, and last name are configured by the file. The object will be disabled initially. Once you have reset the password, you can enable the object.
Utilizing Active Directory Command-Line Tools
Windows Server 2003 supports a number of powerful command-line tools to facilitate the management of Active Directory. The following is a list, and brief description, of each tool:
* DSADD Adds objects to the directory.
* DSGET Displays (“gets”) properties of objects in the directory.
* DSMOD Modifies select attributes of an existing object in the directory.
* DSMOVE Moves an object from its current container to a new location.
* DSRM Removes an object, the complete subtree under an object, or both.
*DSQUERY Queries Active Directory for objects that match a specified search criteria. This command is often used to create a list of objects, which are then piped to the other command-line tools for management or modification.
These tools use one or more of the following components in their command-line switches:
*Target object type: One of a predefined set of values that correlate with an object class in Active Directory. Common examples are: computer, user, OU, group, and server (meaning domain controller).
*Target object identity: The distinguished name (DN) of the object against which the command is running. The DN of an object is an attribute of each object that represents the object’s name and location within an Active Directory forest. For example, you created a user object with the distinguished name: CN=Manu, OU=Employees, DC=mcseweb, DC=com.
*Server: You can specify the domain controller against which you want to run the command.
*User: You can specify a user name and password with which to run the command. This is useful if you are logged in with non-administrative credentials and wish to launch the command with elevated credentials.
In addition, switches and parameters are case-insensitive, and can be prefixed with either a dash (“-”) or a slash (“/”).
DSQUERY
The DSQUERY command queries Active Directory for objects that match a specific criteria set. The command’s basic syntax is:
dsquery object_type [{StartNode forestroot domainroot}] [-o {dn rdn samid}] [-scope {subtree onelevel
base}] [-name Name] [-desc Description] [-upn UPN] [-samid SAMName] [-inactive NumberOfWeeks] [-stalepwd NumberOfDays] [-disabled] [{-s Server -d Domain}] [-u UserName] [-p {Password *}]
The basic parameters are summarized in below table:
Parameters for the DSQUERY Command
Query scope
object_type: Required. The object type represents the object class(es) which will be searched. The object type can include computer, contact, group, OU, server, user, or the wildcard “*” to represent any object class. This lesson will focus on the command’s use in querying for the user object type.
{StartNode forestroot domainroot}: Optional. Specifies the node from which the search begins. You can specify the forest root (forestroot), domain root (domainroot), or a node’s dis-tinguished name (StartNode). If forestroot is specified, the search is performed using the global catalog. The default value is domainroot.
-scope {subtree onelevel base}: Specifies the scope of the search. A value of subtree indicates that the scope is a subtree rooted at start node. A value of onelevel indicates the immediate children of start node only. A value of base indicates the single object represented by start node. If forestroot is specified as StartNode, subtree is the only valid scope. By default, the subtree search scope is used.
How to display the result set
-o {dn, rdn, samid}: Specifies the format in which the list of entries found by the search will be outputted or displayed. A dn value displays the distinguished name of each entry. A rdn value displays the relative distinguished name of each entry. A samid value displays the Security Accounts Manager (SAM) account name of each entry. By default, the dn format is used.
Query criteria
-name Name: Searches for users whose name attributes (value of CN attribute) matches Name. You can use wildcards. For example, “jo*” or “*hn” or “j*hn”.
-desc Description: Searches for users whose description attribute matches Description. You can use wildcards.
-upn UPN: Searches for users whose UPN attribute matches UPN.
-samid SAMName: Searches for users whose SAM account name matches SAMName. You can use wildcards.
-inactive NumberOfWeeks: Searches for all users that have been inactive (stale) for the specified number of weeks.
-stalepwd NumberOfDays: Searches for all users who have not changed their passwords for the specified number of days.
-disabled: Searches for all users whose accounts are disabled.
Domain controller and credentials used for the command
{-s Server -d Domain}: Connects to a specified remote server or domain.
-u UserName: Specifies the user name with which the user logs on to a remote server. By default, -u uses the user name with which the user logged on. You can use any of the following formats to specify a user name
*user name (for example, rocky)
*domain\user name (for example, widgets\ rocky)
*UPN (for example, rocky @widgets.microsoft.com)
-p {Password *} Specifies to use either a password or a * to log on to a remote server. If you type *, you are prompted for a password.
DSADD
The DSADD command enables you to create objects in Active Directory. When creating a user, utilize the DSADD USER command. DSADD parameters allow you to con-figure specific properties of an object. The parameters are self-explanatory, however the Windows Server 2003 Help And Support Center provides thorough descriptions of the DSADD command’s parameters if you desire more explanation.
dsadd user UserDN…
The UserDN… parameter is one or more distinguished names for the new user object(s). If a DN includes a space, surround the entire DN with quotation marks. The UserDN… parameter can be entered one of the following ways:
*By piping a list of DNs from another command, such as DSQUERY.
*By typing each DN on the command line, separated by spaces.
*By leaving the DN parameter empty, at which point you can type the DNs, one at a time, at the keyboard console of the command prompt. Press ENTER after each DN. Press CTRL+Z and ENTER after the last DN.
The DSADD USER command can take the following optional parameters after the DN parameter:
*-samid SAMName
*-upn UPN
*-fn FirstName
*-mi Initial
*-ln LastName
*-display DisplayName
*-empid EmployeeID
*-pwd {Password *} where * will prompt you for a password
*-desc Description
*-memberof GroupDN;...
*-office Office
*-tel PhoneNumber
*-email Email
*-hometel HomePhoneNumber
*-pager PagerNumber
*-mobile CellPhoneNumber
*-fax FaxNumber
*-iptel IPPhoneNumber
*-webpg WebPage
*-title Title
*-dept Department
*-company Company
*-mgr ManagerDN
*-hmdir HomeDirectory
*-hmdrv DriveLetter:
*-profile ProfilePath
*-loscr ScriptPath
*-mustchpwd {yes no}
*-canchpwd {yes no}
*-reversiblepwd {yes no}
*-pwdneverexpires {yes no}
*-acctexpires NumberOfDays
*-disabled {yes no}
As with DSQUERY, you can add -s, -u, and -p parameters to specify the domain controller against which DSADD will run, and the user name and password—the credentials—that will be used to execute the command.
*{-s Server -d Domain}
*-u UserName
*-p {Password *}
The special token $username$ (case-insensitive) may replace the SAM account name in the value of the -email, -hmdir, -profile, and -webpg parameters. For example, if a SAM account name is “mac,” the -hmdir parameter can be written in either of the following formats:
*-hmdir\users\ mac \home
*-hmdir\users\$username$\home
DSMOD
The DSMOD command modifies the properties of one or more existing objects.
dsmod user UserDN ... parameters
The command handles the UserDN… parameter exactly as the DSADD command, and takes the same parameters. Of course now, instead of adding an object with properties, you are modifying an existing object. Note that the exceptions are that you cannot modify the SAMName (-samid parameter) or group membership (-memberof parameter) of a user object using the DSMOD USER command. You can use the DSMOD GROUP command, discussed in Topic, “Group Accounts,” to change group membership from a command-line utility.
The DSMOD command also takes the -c parameter. This parameter puts DSMOD into continuous operation mode, in which it reports errors but continues to modify the objects. Without the -c parameter, DSMOD will stop operation at the first error.
DSGET
The DSGET command gets, and outputs, selected properties of one or more existing objects.
dsget user UserDN ... parameters
The command handles the UserDN… parameter exactly as the DSADD command does, and takes the same parameters except that DSGET takes only the parameter and not an associated value. For example, DSGET takes the -samid parameter, not the -samid SAMName parameter and value. The reason for this is clear: You are displaying, not adding or modifying, a property. In addition, DSGET does not support the password parameter because it cannot display passwords. DSGET adds the -dn and -sid parameters, which display the user object’s distinguished name and SID, respectively.
DSMOVE
The DSMOVE command allows you to move or rename an object within a domain. It cannot be used to move objects between domains. Its basic syntax is:
dsmove ObjectDN [-newname NewName] [-newparent ParentDN]
DSMOVE also supports the -s, -u, and -p parameters described in the section regarding DSQUERY.
The object is specified using its distinguished name in the parameter ObjectDN. To rename the object, specify its new common name in the NewName parameter. Specifying the distinguished name of a container in the ParentDN parameter will move the object to that container.
DSRM
DSRM is used to remove an object, its subtree, or both. The basic syntax is:
dsrm ObjectDN ... [-subtree [-exclude]] [-noprompt] [-c]
It supports the -s, -u, and -p parameters described in the section about DSQUERY.
The object is specified by its distinguished name in the ObjectDN parameter. The -subtree switch directs DSRM to remove the objects contents if the object is a container object. The -exclude switch excludes the object itself, and can be used only in conjunction with -subtree. Specifying -subtree and -exclude would, for example, delete an OU and its subtree, but leave the OU intact. By default, without the -subtree or -exclude switches, only the object is deleted.
You will be prompted to confirm the deletion of each object, unless you specify the -noprompt parameter. The -c switch puts DSRM into continuous operation mode, in which errors are reported but the command keeps processing additional objects. With-out the -c switch, processing halts on the first error.
Creating and Utilizing User Object Templates
It is common for objects to share similar properties. For example, all sales representatives may belong to the same security groups, are allowed to log on to the network during the same hours, and have home folders and roaming profiles on the same server. In such cases, it is helpful when creating a user object for that object to be pre-populated with common properties. This can be accomplished by creating a generic user object—often called a template—and then copying that object to create new users.
To generate a user template, create a user and populate its properties. Put the user into appropriate groups.
To create a user based on the template, select the template and choose Copy from the Action menu. You will be prompted for properties similar to those when you created a new user: first and last name, initials, logon names, password, and account options. When the object is created, you will find that properties are copied from the template based on the following property-page-based description:
*General: No properties copied
*Address: All properties except Street address are copied
*Account: All properties are copied, except for logon names, which you are prompted to enter when copying the template
*Profile: All properties are copied, and the profile and home-folder paths are modified to reflect the new user’s logon name
*Telephones: No properties are copied
*Organization: All properties are copied, except for Title
*Member Of: All properties are copied
* Dial-in, Environment, Sessions, Remote Control, Terminal Services Profile, COM+: No properties are copied
Importing User Objects Using CSVDE
CSVDE is a command-line utility that allows you to import or export objects in Active Directory from (or to) a comma-delimited text file (also known as a comma-separated value text file), which is, of course, a common format easily read in Notepad and Microsoft Excel. The command is a powerful way to generate objects quickly. The command’s basic syntax is
csvde [-i] [-f FileName] [-k]
-i: Specifies import mode. If not specified, the default mode is export.
-f: FileName: Identifies the import file name.
-k: Ignores errors including “object already exists,” “constraint violation,” and “attribute or value already exists” during the import operation and continues processing.
The import file itself is a comma-delimited text file (*.csv or *.txt), in which the first line is a list of Lightweight Directory Access Protocol (LDAP) attribute names for the attributes imported, followed by one line for each object. Each object must contain exactly the attributes listed on the first line. A sample file follows:
DN,objectClass,sAMAccountName,sn,givenName,userPrincipalName
"CN=Prashant Pandey,OU=Employees,DC=mcseweb,DC=com", user,ppandey,pandey,prashant,prashant.pandey@mcseweb.com
This file, when imported, would create a user object in the Employees OU called Scott Bishop. The logon names, first, and last name are configured by the file. The object will be disabled initially. Once you have reset the password, you can enable the object.
Utilizing Active Directory Command-Line Tools
Windows Server 2003 supports a number of powerful command-line tools to facilitate the management of Active Directory. The following is a list, and brief description, of each tool:
* DSADD Adds objects to the directory.
* DSGET Displays (“gets”) properties of objects in the directory.
* DSMOD Modifies select attributes of an existing object in the directory.
* DSMOVE Moves an object from its current container to a new location.
* DSRM Removes an object, the complete subtree under an object, or both.
*DSQUERY Queries Active Directory for objects that match a specified search criteria. This command is often used to create a list of objects, which are then piped to the other command-line tools for management or modification.
These tools use one or more of the following components in their command-line switches:
*Target object type: One of a predefined set of values that correlate with an object class in Active Directory. Common examples are: computer, user, OU, group, and server (meaning domain controller).
*Target object identity: The distinguished name (DN) of the object against which the command is running. The DN of an object is an attribute of each object that represents the object’s name and location within an Active Directory forest. For example, you created a user object with the distinguished name: CN=Manu, OU=Employees, DC=mcseweb, DC=com.
*Server: You can specify the domain controller against which you want to run the command.
*User: You can specify a user name and password with which to run the command. This is useful if you are logged in with non-administrative credentials and wish to launch the command with elevated credentials.
In addition, switches and parameters are case-insensitive, and can be prefixed with either a dash (“-”) or a slash (“/”).
DSQUERY
The DSQUERY command queries Active Directory for objects that match a specific criteria set. The command’s basic syntax is:
dsquery object_type [{StartNode forestroot domainroot}] [-o {dn rdn samid}] [-scope {subtree onelevel
base}] [-name Name] [-desc Description] [-upn UPN] [-samid SAMName] [-inactive NumberOfWeeks] [-stalepwd NumberOfDays] [-disabled] [{-s Server -d Domain}] [-u UserName] [-p {Password *}]
The basic parameters are summarized in below table:
Parameters for the DSQUERY Command
Query scope
object_type: Required. The object type represents the object class(es) which will be searched. The object type can include computer, contact, group, OU, server, user, or the wildcard “*” to represent any object class. This lesson will focus on the command’s use in querying for the user object type.
{StartNode forestroot domainroot}: Optional. Specifies the node from which the search begins. You can specify the forest root (forestroot), domain root (domainroot), or a node’s dis-tinguished name (StartNode). If forestroot is specified, the search is performed using the global catalog. The default value is domainroot.
-scope {subtree onelevel base}: Specifies the scope of the search. A value of subtree indicates that the scope is a subtree rooted at start node. A value of onelevel indicates the immediate children of start node only. A value of base indicates the single object represented by start node. If forestroot is specified as StartNode, subtree is the only valid scope. By default, the subtree search scope is used.
How to display the result set
-o {dn, rdn, samid}: Specifies the format in which the list of entries found by the search will be outputted or displayed. A dn value displays the distinguished name of each entry. A rdn value displays the relative distinguished name of each entry. A samid value displays the Security Accounts Manager (SAM) account name of each entry. By default, the dn format is used.
Query criteria
-name Name: Searches for users whose name attributes (value of CN attribute) matches Name. You can use wildcards. For example, “jo*” or “*hn” or “j*hn”.
-desc Description: Searches for users whose description attribute matches Description. You can use wildcards.
-upn UPN: Searches for users whose UPN attribute matches UPN.
-samid SAMName: Searches for users whose SAM account name matches SAMName. You can use wildcards.
-inactive NumberOfWeeks: Searches for all users that have been inactive (stale) for the specified number of weeks.
-stalepwd NumberOfDays: Searches for all users who have not changed their passwords for the specified number of days.
-disabled: Searches for all users whose accounts are disabled.
Domain controller and credentials used for the command
{-s Server -d Domain}: Connects to a specified remote server or domain.
-u UserName: Specifies the user name with which the user logs on to a remote server. By default, -u uses the user name with which the user logged on. You can use any of the following formats to specify a user name
*user name (for example, rocky)
*domain\user name (for example, widgets\ rocky)
*UPN (for example, rocky @widgets.microsoft.com)
-p {Password *} Specifies to use either a password or a * to log on to a remote server. If you type *, you are prompted for a password.
DSADD
The DSADD command enables you to create objects in Active Directory. When creating a user, utilize the DSADD USER command. DSADD parameters allow you to con-figure specific properties of an object. The parameters are self-explanatory, however the Windows Server 2003 Help And Support Center provides thorough descriptions of the DSADD command’s parameters if you desire more explanation.
dsadd user UserDN…
The UserDN… parameter is one or more distinguished names for the new user object(s). If a DN includes a space, surround the entire DN with quotation marks. The UserDN… parameter can be entered one of the following ways:
*By piping a list of DNs from another command, such as DSQUERY.
*By typing each DN on the command line, separated by spaces.
*By leaving the DN parameter empty, at which point you can type the DNs, one at a time, at the keyboard console of the command prompt. Press ENTER after each DN. Press CTRL+Z and ENTER after the last DN.
The DSADD USER command can take the following optional parameters after the DN parameter:
*-samid SAMName
*-upn UPN
*-fn FirstName
*-mi Initial
*-ln LastName
*-display DisplayName
*-empid EmployeeID
*-pwd {Password *} where * will prompt you for a password
*-desc Description
*-memberof GroupDN;...
*-office Office
*-tel PhoneNumber
*-email Email
*-hometel HomePhoneNumber
*-pager PagerNumber
*-mobile CellPhoneNumber
*-fax FaxNumber
*-iptel IPPhoneNumber
*-webpg WebPage
*-title Title
*-dept Department
*-company Company
*-mgr ManagerDN
*-hmdir HomeDirectory
*-hmdrv DriveLetter:
*-profile ProfilePath
*-loscr ScriptPath
*-mustchpwd {yes no}
*-canchpwd {yes no}
*-reversiblepwd {yes no}
*-pwdneverexpires {yes no}
*-acctexpires NumberOfDays
*-disabled {yes no}
As with DSQUERY, you can add -s, -u, and -p parameters to specify the domain controller against which DSADD will run, and the user name and password—the credentials—that will be used to execute the command.
*{-s Server -d Domain}
*-u UserName
*-p {Password *}
The special token $username$ (case-insensitive) may replace the SAM account name in the value of the -email, -hmdir, -profile, and -webpg parameters. For example, if a SAM account name is “mac,” the -hmdir parameter can be written in either of the following formats:
*-hmdir\users\ mac \home
*-hmdir\users\$username$\home
DSMOD
The DSMOD command modifies the properties of one or more existing objects.
dsmod user UserDN ... parameters
The command handles the UserDN… parameter exactly as the DSADD command, and takes the same parameters. Of course now, instead of adding an object with properties, you are modifying an existing object. Note that the exceptions are that you cannot modify the SAMName (-samid parameter) or group membership (-memberof parameter) of a user object using the DSMOD USER command. You can use the DSMOD GROUP command, discussed in Topic, “Group Accounts,” to change group membership from a command-line utility.
The DSMOD command also takes the -c parameter. This parameter puts DSMOD into continuous operation mode, in which it reports errors but continues to modify the objects. Without the -c parameter, DSMOD will stop operation at the first error.
DSGET
The DSGET command gets, and outputs, selected properties of one or more existing objects.
dsget user UserDN ... parameters
The command handles the UserDN… parameter exactly as the DSADD command does, and takes the same parameters except that DSGET takes only the parameter and not an associated value. For example, DSGET takes the -samid parameter, not the -samid SAMName parameter and value. The reason for this is clear: You are displaying, not adding or modifying, a property. In addition, DSGET does not support the password parameter because it cannot display passwords. DSGET adds the -dn and -sid parameters, which display the user object’s distinguished name and SID, respectively.
DSMOVE
The DSMOVE command allows you to move or rename an object within a domain. It cannot be used to move objects between domains. Its basic syntax is:
dsmove ObjectDN [-newname NewName] [-newparent ParentDN]
DSMOVE also supports the -s, -u, and -p parameters described in the section regarding DSQUERY.
The object is specified using its distinguished name in the parameter ObjectDN. To rename the object, specify its new common name in the NewName parameter. Specifying the distinguished name of a container in the ParentDN parameter will move the object to that container.
DSRM
DSRM is used to remove an object, its subtree, or both. The basic syntax is:
dsrm ObjectDN ... [-subtree [-exclude]] [-noprompt] [-c]
It supports the -s, -u, and -p parameters described in the section about DSQUERY.
The object is specified by its distinguished name in the ObjectDN parameter. The -subtree switch directs DSRM to remove the objects contents if the object is a container object. The -exclude switch excludes the object itself, and can be used only in conjunction with -subtree. Specifying -subtree and -exclude would, for example, delete an OU and its subtree, but leave the OU intact. By default, without the -subtree or -exclude switches, only the object is deleted.
You will be prompted to confirm the deletion of each object, unless you specify the -noprompt parameter. The -c switch puts DSRM into continuous operation mode, in which errors are reported but the command keeps processing additional objects. With-out the -c switch, processing halts on the first error.
Saturday, December 19, 2009
Creating and Managing User Objects
The user account is integrated into the Active Directory user object. The user object includes not just the user’s name, password, and SID, but also contact information, such as telephone numbers and addresses; organizational information including job title, direct reports and manager; group memberships; and configuration such as roam¬ing profile, terminal services, remote access, and remote control settings. This Topic will review and enhance your understanding of user objects in Active Directory.
Creating User Objects with Active Directory Users and Computers
You can create a user object with the Active Directory Users and Computers snap-in. Although user objects can be created in the domain or any of the default containers, it is best to create a user in an organizational unit, so that administrative delegation and Group Policy Objects (GPOs) can be fully leveraged.
To create a user object, select the container in which you want to create the object, click the Action menu, then choose New and choose User. You must be a member of the Enterprise Admins, Domain Admins, or Account Operators groups, or you must have been delegated administrative permissions to create user objects in the container. If you do not have sufficient permissions to create user objects, the New User com¬mand will be unavailable to you.
The New Object–User dialog box appears, as shown in below Figure. The first page of the New Object–User dialog box requests properties related to the user name.
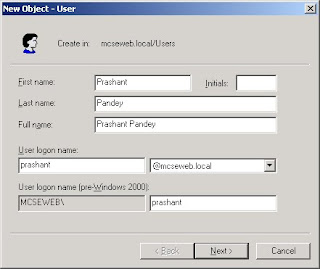
First Name: The user’s first name. Not required.
Initials: The middle initials of the user’s name. Not required.
Last Name: The user’s last name. Not required.
Full Name: The user’s full name. If you enter values for the first or last name, the full name property is populated automatically. However, you can easily modify the sug¬gested value. The field is required. The name entered here generates several user object properties, specifically CN (common name), DN (distinguished name), name, and display Name. Because CN must be unique within a container, the name entered here must be unique relative to all other objects in the OU (or other container) in which you create the user object.
User Logon Name: The user principal name (UPN) consists of a logon name and a UPN suffix Which is, by default, the DNS name of the domain in which you create the object. The property is required and the entire UPN, in the format logon¬name@UPN-suffix, must be unique within the Active Directory forest. A sample UPN would be anyone@mcseweb.com. The UPN can be used to log on to any Microsoft Windows system running Windows 2000, Windows XP, or Windows Server 2003.
User Logon Name (Pre-Windows 2000): This logon name is used to log on from down-level clients, such as Microsoft Name (Pre– Windows 95, Windows 98, Windows Millennium Edition (Windows Me), Windows 2000) Windows NT 4, or Windows NT 3.51. This field is required and must be unique within the domain. Once you have entered the values in the first page of the New Object–User dialog box, click Next. The second page of the dialog box, shown in below Figure, allows you to enter the user password and to set account flags.
Once you have entered the values in the first page of the New Object–User dialog box, click Next. The second page of the dialog box, shown in Below Figure, allows you to enter the user password and to set account flags.

Property Description
Password: The password that is used to authenticate the user. For security reasons, you should always assign a password. The password is masked as you type it.
Confirm Password: Confirm the password by typing it a second time to make sure you typed it correctly.
User Must Change Password At Next Logon: Select this check box if you want the user to change the password you have entered the first time he or she logs on. You cannot select this option if you have selected Password Never Expires. Selecting this option will automatically clear the mutually exclusive option User Cannot Change Password.
User Cannot Change Password: Select this check box if you have more than one person using the same domain user account (such as Guest) or to maintain control over user account passwords. This option is commonly used to manage service account pass-words. You cannot select this option if you have selected User Must Change Password At Next Logon.
Password Never Expires: Select this check box if you never want the password to expire. This option will automatically clear the User Must Change Password At Next Logon setting, as they are mutually exclusive. This option is commonly used to manage ser¬vice account passwords.
Account Is Disabled: Select this check box to disable the user account, for example, when creating an object for a newly hired employee who does not yet need access to the network.
Managing User Objects with Active Directory Users And Computers
When creating a user, you are prompted to configure the most common user properties, including logon names and password. However, user objects support numerous additional properties that you can configure at any time using Active Directory Users And Computers. These properties facilitate the administration of, and the searching for, an object.
To configure the properties of a user object, select the object, click the Action menu, and then choose Properties. The user’s Properties dialog box appears, as shown in below Figure. An alternative way to view an object’s properties would be to right-click the object and select Properties from the shortcut menu

The property pages in the Properties dialog box expose properties that fall into several broad categories
Account properties: the Account tab These properties include those that are configured when you create a user object, including logon names, password and account flags.
Personal information: the General, Address, Telephones, and Organization tabs The General tab exposes the name properties that are configured when you create a user object.
User configuration management: the Profile tab Here you can configure the user’s profile path, logon script, and home folder locations.
Group membership: the Member Of tab You can add and remove user groups, and set the user’s primary group.
Terminal services: the Terminal Services Profile, Environment, Remote Control, and Sessions tabs These four tabs allow you to configure and man-age the user’s experience when they are connected to a Terminal Services session.
Remote access: the Dial-in tab Allows you to enable and configure remote access permission for a user.
Applications: the COM+ tab Assigns Active Directory COM+ partition sets to the user. This feature, new to Windows Server 2003, facilitates the management of distributed applications.
Account Properties
Of particular note are the user’s account properties, on the Account tab of the user’s Properties dialog box. An example appears in below Figure

Several of these properties were discussed below. Those properties were configured when creating the user object and can be modified, as can a larger set of account properties, using the Account tab. Several properties are not necessarily self-explanatory, and deserve definition is given below
Property Description
Logon Hours: Click Logon Hours to configure the hours during which a user is allowed to log on to the network.
Log On To: Click Log On To if you want to limit the workstations to which the user can log on. This is called Computer Restrictions in other parts of the user interface. You must have NetBIOS over TCP/IP enabled for this feature to restrict users because it uses the computer name, rather than the Media Access Control (MAC) address of its network card, to restrict logon.
Store Password using reversible encryption:This option, which stores the password in Active Directory without using Active Directory’s powerful, nonreversible encryption hashing algorithm, exists to support applications that require knowledge of the user pass-word. If it is not absolutely required, do not enable this option because it weakens password security significantly. Passwords stored using reversible encryptions are similar to those stored as plaintext.
Macintosh clients using the AppleTalk protocol require knowledge of the user password. If a user logs on using a Macintosh client, you will need to select the option to Store password using reversible encryption.
Smart Card Is Required For Interactive Logon: Smart cards are portable, tamper-resistant hardware devices that store unique identification information for a user. They are attached to, or inserted into, a system and provide an additional, physical identification component to the authentication process.
Account Is Trusted For Delegation: This option enables a service account to impersonate a user to access network resources on behalf of a user. This option is not typically selected, certainly not for a user object representing a human being. It is used more often for service accounts in three-tier (or multi-tier) application infrastructures.
Account Expires: Use the Account Expires controls to specify when an account expires.
Managing Properties on Multiple Accounts Simultaneously
Windows Server 2003 allows you to modify the properties of multiple user accounts simultaneously. You simply select several user objects by holding the CTRL key as you click each user, or using any other multi selection options. Be certain that you select only objects of one class, such as users. Once you have multi selected, on the Action menu, choose Properties.
When you have multi selected user objects, a subset of properties is available for modification.
General tab: Description, Office, Telephone Number, Fax, Web Page, E-mail
Account tab: UPN Suffix, Logon Hours, Computer Restrictions (logon workstations), all Account Options, Account Expires
Address: Street, PO Box, City, State/Province, ZIP/Postal Code, Country/Region
Profile: Profile Path, Logon Script, and Home Folder
Organization: Title, Department, Company, Manager
Moving a User
If a user is transferred within an organization, it is possible that you might need to move his or her user object to reflect a change in the administration or configuration of the object. To move an object in Active Directory Users and Computers, select the object and, from the Action menu, choose Move. Alternatively, you can right-click the object and select Move from the shortcut menu
Creating User Objects with Active Directory Users and Computers
You can create a user object with the Active Directory Users and Computers snap-in. Although user objects can be created in the domain or any of the default containers, it is best to create a user in an organizational unit, so that administrative delegation and Group Policy Objects (GPOs) can be fully leveraged.
To create a user object, select the container in which you want to create the object, click the Action menu, then choose New and choose User. You must be a member of the Enterprise Admins, Domain Admins, or Account Operators groups, or you must have been delegated administrative permissions to create user objects in the container. If you do not have sufficient permissions to create user objects, the New User com¬mand will be unavailable to you.
The New Object–User dialog box appears, as shown in below Figure. The first page of the New Object–User dialog box requests properties related to the user name.

Property Description
First Name: The user’s first name. Not required.
Initials: The middle initials of the user’s name. Not required.
Last Name: The user’s last name. Not required.
Full Name: The user’s full name. If you enter values for the first or last name, the full name property is populated automatically. However, you can easily modify the sug¬gested value. The field is required. The name entered here generates several user object properties, specifically CN (common name), DN (distinguished name), name, and display Name. Because CN must be unique within a container, the name entered here must be unique relative to all other objects in the OU (or other container) in which you create the user object.
User Logon Name: The user principal name (UPN) consists of a logon name and a UPN suffix Which is, by default, the DNS name of the domain in which you create the object. The property is required and the entire UPN, in the format logon¬name@UPN-suffix, must be unique within the Active Directory forest. A sample UPN would be anyone@mcseweb.com. The UPN can be used to log on to any Microsoft Windows system running Windows 2000, Windows XP, or Windows Server 2003.
User Logon Name (Pre-Windows 2000): This logon name is used to log on from down-level clients, such as Microsoft Name (Pre– Windows 95, Windows 98, Windows Millennium Edition (Windows Me), Windows 2000) Windows NT 4, or Windows NT 3.51. This field is required and must be unique within the domain. Once you have entered the values in the first page of the New Object–User dialog box, click Next. The second page of the dialog box, shown in below Figure, allows you to enter the user password and to set account flags.
Once you have entered the values in the first page of the New Object–User dialog box, click Next. The second page of the dialog box, shown in Below Figure, allows you to enter the user password and to set account flags.
Password: The password that is used to authenticate the user. For security reasons, you should always assign a password. The password is masked as you type it.
Confirm Password: Confirm the password by typing it a second time to make sure you typed it correctly.
User Must Change Password At Next Logon: Select this check box if you want the user to change the password you have entered the first time he or she logs on. You cannot select this option if you have selected Password Never Expires. Selecting this option will automatically clear the mutually exclusive option User Cannot Change Password.
User Cannot Change Password: Select this check box if you have more than one person using the same domain user account (such as Guest) or to maintain control over user account passwords. This option is commonly used to manage service account pass-words. You cannot select this option if you have selected User Must Change Password At Next Logon.
Password Never Expires: Select this check box if you never want the password to expire. This option will automatically clear the User Must Change Password At Next Logon setting, as they are mutually exclusive. This option is commonly used to manage ser¬vice account passwords.
Account Is Disabled: Select this check box to disable the user account, for example, when creating an object for a newly hired employee who does not yet need access to the network.
Managing User Objects with Active Directory Users And Computers
When creating a user, you are prompted to configure the most common user properties, including logon names and password. However, user objects support numerous additional properties that you can configure at any time using Active Directory Users And Computers. These properties facilitate the administration of, and the searching for, an object.
To configure the properties of a user object, select the object, click the Action menu, and then choose Properties. The user’s Properties dialog box appears, as shown in below Figure. An alternative way to view an object’s properties would be to right-click the object and select Properties from the shortcut menu

Account properties: the Account tab These properties include those that are configured when you create a user object, including logon names, password and account flags.
Personal information: the General, Address, Telephones, and Organization tabs The General tab exposes the name properties that are configured when you create a user object.
User configuration management: the Profile tab Here you can configure the user’s profile path, logon script, and home folder locations.
Group membership: the Member Of tab You can add and remove user groups, and set the user’s primary group.
Terminal services: the Terminal Services Profile, Environment, Remote Control, and Sessions tabs These four tabs allow you to configure and man-age the user’s experience when they are connected to a Terminal Services session.
Remote access: the Dial-in tab Allows you to enable and configure remote access permission for a user.
Applications: the COM+ tab Assigns Active Directory COM+ partition sets to the user. This feature, new to Windows Server 2003, facilitates the management of distributed applications.
Account Properties
Of particular note are the user’s account properties, on the Account tab of the user’s Properties dialog box. An example appears in below Figure

Property Description
Logon Hours: Click Logon Hours to configure the hours during which a user is allowed to log on to the network.
Log On To: Click Log On To if you want to limit the workstations to which the user can log on. This is called Computer Restrictions in other parts of the user interface. You must have NetBIOS over TCP/IP enabled for this feature to restrict users because it uses the computer name, rather than the Media Access Control (MAC) address of its network card, to restrict logon.
Store Password using reversible encryption:This option, which stores the password in Active Directory without using Active Directory’s powerful, nonreversible encryption hashing algorithm, exists to support applications that require knowledge of the user pass-word. If it is not absolutely required, do not enable this option because it weakens password security significantly. Passwords stored using reversible encryptions are similar to those stored as plaintext.
Macintosh clients using the AppleTalk protocol require knowledge of the user password. If a user logs on using a Macintosh client, you will need to select the option to Store password using reversible encryption.
Smart Card Is Required For Interactive Logon: Smart cards are portable, tamper-resistant hardware devices that store unique identification information for a user. They are attached to, or inserted into, a system and provide an additional, physical identification component to the authentication process.
Account Is Trusted For Delegation: This option enables a service account to impersonate a user to access network resources on behalf of a user. This option is not typically selected, certainly not for a user object representing a human being. It is used more often for service accounts in three-tier (or multi-tier) application infrastructures.
Account Expires: Use the Account Expires controls to specify when an account expires.
Managing Properties on Multiple Accounts Simultaneously
Windows Server 2003 allows you to modify the properties of multiple user accounts simultaneously. You simply select several user objects by holding the CTRL key as you click each user, or using any other multi selection options. Be certain that you select only objects of one class, such as users. Once you have multi selected, on the Action menu, choose Properties.
When you have multi selected user objects, a subset of properties is available for modification.
General tab: Description, Office, Telephone Number, Fax, Web Page, E-mail
Account tab: UPN Suffix, Logon Hours, Computer Restrictions (logon workstations), all Account Options, Account Expires
Address: Street, PO Box, City, State/Province, ZIP/Postal Code, Country/Region
Profile: Profile Path, Logon Script, and Home Folder
Organization: Title, Department, Company, Manager
Moving a User
If a user is transferred within an organization, it is possible that you might need to move his or her user object to reflect a change in the administration or configuration of the object. To move an object in Active Directory Users and Computers, select the object and, from the Action menu, choose Move. Alternatively, you can right-click the object and select Move from the shortcut menu
Subscribe to:
Posts (Atom)


