
1. Understanding Disk Storage Options
2. Configuring Disks and Volumes
3. Maintaining Disk Storage Volumes
4. Implementing RAID
Wednesday, September 29, 2010
Implementing RAID
A disk subsystem that includes a RAID configuration enables the disks in the system to work in concert to improve performance, fault tolerance, or both. In this lesson, you will learn about the three levels of RAID that can be created and managed by Windows Server 2003. You will learn the impact that each type of volume has on performance, volume capacity, and fault tolerance, and how to recover data in the event of a disk failure in a RAID configuration.
Topic “Understanding Disk Storage Options” introduced the types of storage units available on a Windows Server 2003 computer. The types of volumes that reflect RAID configurations are striped volumes, mirrored volumes, and RAID-5 volumes.
Implementing Disk Fault Tolerance
As mentioned in “Understanding Disk Storage Options”, fault tolerance is the ability of a computer or operating system to respond to a catastrophic event, such as a power outage or hardware failure, so that no data is lost and that work in progress is not corrupted. Fully fault-tolerant systems using fault-tolerant disk arrays prevent the loss of data. You can implement RAID fault tolerance as either a hardware or software solution.
Hardware Implementations of RAID
In a hardware solution, the disk controller interface handles the creation and regeneration of redundant information. Some hardware vendors implement RAID data protection directly in their hardware, as with disk array controller cards. Because these methods are vendor specific and bypass the fault tolerance software drivers of the operating system, they offer performance improvements over software implementations of RAID.
Consider the following points when deciding whether to use a software or hardware implementation of RAID:
■Hardware fault tolerance is more expensive than software fault tolerance and might limit equipment options to a single vendor.
■Hardware fault tolerance generally provides faster disk I/O than software fault tolerance.
■Hardware fault tolerance solutions might implement hot swapping of hard disks to allow for replacement of a failed hard disk without shutting down the computer and hot sparing so that a failed disk is automatically replaced by an online spare.
Software Implementations of RAID
Windows Server 2003 supports one RAID implementation (striped, RAID-0) that is not fault-tolerant and two implementations that provide fault tolerance: mirrored volumes (RAID-1) and striped volumes with parity (RAID-5). You can create fault-tolerant RAID volumes only on dynamic disks formatted with NTFS.
With Windows Server 2003 implementations of RAID, there is no fault tolerance following a failure until the fault is repaired. If a second fault occurs before the data lost from the first fault is regenerated, you can recover the data only by restoring it from a backup.
Striped Volumes
A striped volume, which implements RAID Level 0, uses two or more disks and writes data to all disks at the same rate. By doing so, I/O requests are handled by multiple spindles, and read/write performance is the beneficiary. Striped volumes are popular for configurations in which performance and large storage area are critical, such as computer-aided design (CAD) and digital media applications.
Creating a Striped Volume
To create a striped volume, you must have unallocated space on at least two dynamic disks. Right-click one of the spaces and choose Create Volume. The New Volume Wizard will step you through the process of selecting a striped volume and choosing other disk space to include in the volume. Striped volumes can be assigned a drive letter and folder paths. They can be formatted only with NTFS. Up to 32 disks can participate in a striped volume. The amount of space used on each disk in the volume will be equal to the smallest amount of space on any one disk. For example, if Disk 1 has 200 GB of unallocated space, and Disk 2 has 120 GB of space, the striped volume can contain, at most, 240 GB as the size of the stripe on Disk 1 can be no greater than the size of the stripe on Disk 2. All disk space in the volume is used for data; there is no space used for fault tolerance.
Recovering a Striped Volume
Because data is striped over more than one physical disk, performance is enhanced, but fault tolerance is decreased—there is more risk because if any one drive in the volume fails, all data on the volume is lost. It is important to have a backup of striped data. If one or more disks in a striped volume fails, you must delete the volume, replace the failed disk(s) and recreate the volume. Then you must restore data from the backup.
Mirrored Volumes
A mirrored volume provides good performance along with excellent fault tolerance. Two disks participate in a mirrored volume, and all data is written to both volumes. As with all RAID configurations, use separate controllers (by adding a controller, you create a configuration called “duplexing”) for maximum performance. Mirrored volumes relate to RAID-1 hardware configurations.
Create Mirrored Volumes
To create a mirrored volume, you must have unallocated space on two dynamic disks. Right-click one of the spaces and choose Create Volume. The New Volume Wizard will step you through the process of selecting a mirrored volume and choosing space on another disk to include in the volume. Mirrored volumes can be assigned a drive letter and folder paths. Both copies of the mirror share the same assignment.
You can also mirror an existing simple volume by right-clicking the volume and choosing Add Mirror and selecting a drive with sufficient unallocated space.
Once you have established the mirror, the system begins copying data, sector by sector. During that time, the volume status is reported as Resynching.
Recovering from Mirrored Disk Failures
The recovery process for a failed disk within a mirrored volume depends on the type of failure that occurs. If a disk has experienced transient I/O errors, both portions of the mirror will show a status of Failed Redundancy. The disk with the errors will report a status of Offline or Missing, as seen in Below Figure.

After correcting the cause of the I/O error—perhaps a bad cable connection or power supply—right-click the volume on the problematic disk and choose Reactivate Volume or right-click the disk and choose Reactivate Disk. Reactivating brings the disk or volume back online. The mirror will then resynchronize automatically.
If you want to stop mirroring, you have three choices, depending on what you want the outcome to be:
■Delete the volume If you delete the volume, the volume and all the information it contains is removed. The resulting unallocated space is then available for new volumes.
■Remove the mirror If you remove the mirror, the mirror is broken and the space on one of the disks becomes unallocated. The other disk maintains a copy of the data that had been mirrored, but that data is of course no longer fault-tolerant.
■Break the mirror If you break the mirror, the mirror is broken but both disks maintain copies of the data. The portion of the mirror that you select when you choose Break Mirror maintains the original mirrored volume’s drive letter, shared folders, paging file, and reparse points. The secondary drive is given the next available drive letter.
Knowing that information, how do you suppose you would replace a failed disk—a member of the mirrored volume that simply died? Well, after physically replacing the disk, you will need to open Disk Management to rescan, initialize the disk and convert it to dynamic. After all that work you will find that you can’t remirror a mirrored volume, even though half of it doesn’t exist. So far as the remaining disk is concerned, the mirrored volume still exists—its partner in redundancy is just out to lunch. You must remove the mirror to break the mirror. Right-click the mirror and choose Remove Mirror. In the Remove Mirror dialog box, it is important to select the half of the volume that is missing; the volume you select will be deleted when you click Remove Mirror. The volume you did not select will become a simple volume. Once the operation is complete, right-click the healthy, simple volume and choose Add Mirror. Select the new disk and the mirror will be created again.
RAID-5 Volumes
A RAID-5 volume uses three or more physical disks to provide fault tolerance and excellent read performance while reducing the cost of fault tolerance in terms of disk capacity. Data is written to all but one disk in a RAID-5. That volume receives a chunk of data, called parity, which acts as a checksum and provides fault tolerance for the stripe. The calculation of parity during a write operation means that RAID-5 is quite intensive on the server’s processor for a volume that is not read-only. RAID-5 provides improved read performance, however, as data is retrieved from multiple spindles simultaneously.
As data in a file is written to the volume, the parity is distributed among each disk in the set. But from a storage capacity perspective, the amount of space used for fault tolerance is the equivalent of the space used by one disk in the volume.
From a storage capacity perspective, that makes RAID-5 more economical than mirroring. In a minimal, three disk RAID-5 volume, one-third of the capacity is used for parity, as opposed to one-half of a mirrored volume being used for fault tolerance. Because as many as 32 disks can participate in a RAID-5 volume, you can theoretically configure a fault-tolerant volume which uses only 1/32 of its capacity to provide fault tolerance for the entire volume.
Configure RAID-5 Volumes
You need to have space on at least three dynamic disks to be able to create a RAID-5 volume. Right-click one disk’s unallocated space and choose New Volume. The New Volume Wizard will step you through selecting a RAID-5 volume type, and then selecting the disks that will participate in the volume.
The capacity of the volume is limited to the smallest section of unallocated space on any one of the volume’s disks. If Disk 2 has 50 GB of unallocated space, but Disks 3 and 4 have 100 GB of unallocated space, the stripe can only use 50 GB of space on Disks 3 and 4—the space used on each disk in the volume is identical. The capacity, or Volume Size reported by the New Volume Wizard will represent the amount of space available for data after accounting for parity. To continue our example, the RAID-5 volume size would be 100 GB—the total capacity minus the equivalent of one disk’s space for parity.
RAID-5 volumes can be assigned a drive letter or folder paths. They can be formatted only with NTFS.
Because RAID-5 volumes are created as native dynamic volumes from unallocated space, you cannot turn any other type of volume into a RAID-5 volume without backing up that volume’s data and restoring into the new RAID-5 volume.
Recovering a Failed RAID-5 Volume
If a single disk fails in a RAID-5 volume, data can continue to be accessed. During read operations, any missing data is regenerated on the fly through a calculation involving remaining data and parity information. Performance will be degraded and, of course, if a second drive fails it’s time to pull out the backup tapes. RAID-5 and mirrored volumes can only sustain a single drive failure.
If the drive is returned to service, you may need to rescan, and then you will need to right-click the volume and choose Reactivate Volume. The system will then rebuild missing data and the volume will be fully functional again.
If the drive does not offer a Reactivate option, or if you have had to replace the disk, you may need to rescan, initialize the disk, convert it to dynamic, then right-click the volume and choose Repair Volume. You will be asked to select the disk where the missing volume member should be recreated. Select the new disk and the system will regenerate the missing data.
Mirrored Volumes versus RAID-5 Volumes
Mirrored volumes (RAID-1) and RAID-5 volumes provide different levels of fault tolerance. Deciding which option to implement depends on the level of protection you require and the cost of hardware. The major differences between mirrored volumes and RAID-5 volumes are performance and cost. Below Table describes some differences between software-level RAID-1 and RAID-5.
TABLE: RAID Performance And Costs

Creating Fault Tolerance for the System Volume
Because RAID-5 is a native dynamic volume, it is not possible to install or start the Windows Server 2003 operating system on a RAID-5 volume created by the Windows Server 2003 fault-tolerant disk technologies.
The only option for creating fault tolerance for the system, without buying hardware RAID, is thus to mirror the system volume. You can mirror the system volume by following the procedures described for creating a mirrored volume: right-click the system volume and choose Add Mirror. Unlike Windows 2000, you do not need to restart, and the BOOT.INI file is updated automatically so that you can start to the secondary drive if the primary drive fails.
If the drives are attached to IDE controllers, and the primary drive fails, you may have to remove that drive, change the secondary drive to the primary controller and set its jumpers or cable position so that it is the master. Otherwise, the system may not boot to the secondary drive.
Topic “Understanding Disk Storage Options” introduced the types of storage units available on a Windows Server 2003 computer. The types of volumes that reflect RAID configurations are striped volumes, mirrored volumes, and RAID-5 volumes.
Implementing Disk Fault Tolerance
As mentioned in “Understanding Disk Storage Options”, fault tolerance is the ability of a computer or operating system to respond to a catastrophic event, such as a power outage or hardware failure, so that no data is lost and that work in progress is not corrupted. Fully fault-tolerant systems using fault-tolerant disk arrays prevent the loss of data. You can implement RAID fault tolerance as either a hardware or software solution.
Hardware Implementations of RAID
In a hardware solution, the disk controller interface handles the creation and regeneration of redundant information. Some hardware vendors implement RAID data protection directly in their hardware, as with disk array controller cards. Because these methods are vendor specific and bypass the fault tolerance software drivers of the operating system, they offer performance improvements over software implementations of RAID.
Consider the following points when deciding whether to use a software or hardware implementation of RAID:
■Hardware fault tolerance is more expensive than software fault tolerance and might limit equipment options to a single vendor.
■Hardware fault tolerance generally provides faster disk I/O than software fault tolerance.
■Hardware fault tolerance solutions might implement hot swapping of hard disks to allow for replacement of a failed hard disk without shutting down the computer and hot sparing so that a failed disk is automatically replaced by an online spare.
Software Implementations of RAID
Windows Server 2003 supports one RAID implementation (striped, RAID-0) that is not fault-tolerant and two implementations that provide fault tolerance: mirrored volumes (RAID-1) and striped volumes with parity (RAID-5). You can create fault-tolerant RAID volumes only on dynamic disks formatted with NTFS.
With Windows Server 2003 implementations of RAID, there is no fault tolerance following a failure until the fault is repaired. If a second fault occurs before the data lost from the first fault is regenerated, you can recover the data only by restoring it from a backup.
Striped Volumes
A striped volume, which implements RAID Level 0, uses two or more disks and writes data to all disks at the same rate. By doing so, I/O requests are handled by multiple spindles, and read/write performance is the beneficiary. Striped volumes are popular for configurations in which performance and large storage area are critical, such as computer-aided design (CAD) and digital media applications.
Creating a Striped Volume
To create a striped volume, you must have unallocated space on at least two dynamic disks. Right-click one of the spaces and choose Create Volume. The New Volume Wizard will step you through the process of selecting a striped volume and choosing other disk space to include in the volume. Striped volumes can be assigned a drive letter and folder paths. They can be formatted only with NTFS. Up to 32 disks can participate in a striped volume. The amount of space used on each disk in the volume will be equal to the smallest amount of space on any one disk. For example, if Disk 1 has 200 GB of unallocated space, and Disk 2 has 120 GB of space, the striped volume can contain, at most, 240 GB as the size of the stripe on Disk 1 can be no greater than the size of the stripe on Disk 2. All disk space in the volume is used for data; there is no space used for fault tolerance.
Recovering a Striped Volume
Because data is striped over more than one physical disk, performance is enhanced, but fault tolerance is decreased—there is more risk because if any one drive in the volume fails, all data on the volume is lost. It is important to have a backup of striped data. If one or more disks in a striped volume fails, you must delete the volume, replace the failed disk(s) and recreate the volume. Then you must restore data from the backup.
Mirrored Volumes
A mirrored volume provides good performance along with excellent fault tolerance. Two disks participate in a mirrored volume, and all data is written to both volumes. As with all RAID configurations, use separate controllers (by adding a controller, you create a configuration called “duplexing”) for maximum performance. Mirrored volumes relate to RAID-1 hardware configurations.
Create Mirrored Volumes
To create a mirrored volume, you must have unallocated space on two dynamic disks. Right-click one of the spaces and choose Create Volume. The New Volume Wizard will step you through the process of selecting a mirrored volume and choosing space on another disk to include in the volume. Mirrored volumes can be assigned a drive letter and folder paths. Both copies of the mirror share the same assignment.
You can also mirror an existing simple volume by right-clicking the volume and choosing Add Mirror and selecting a drive with sufficient unallocated space.
Once you have established the mirror, the system begins copying data, sector by sector. During that time, the volume status is reported as Resynching.
Recovering from Mirrored Disk Failures
The recovery process for a failed disk within a mirrored volume depends on the type of failure that occurs. If a disk has experienced transient I/O errors, both portions of the mirror will show a status of Failed Redundancy. The disk with the errors will report a status of Offline or Missing, as seen in Below Figure.
After correcting the cause of the I/O error—perhaps a bad cable connection or power supply—right-click the volume on the problematic disk and choose Reactivate Volume or right-click the disk and choose Reactivate Disk. Reactivating brings the disk or volume back online. The mirror will then resynchronize automatically.
If you want to stop mirroring, you have three choices, depending on what you want the outcome to be:
■Delete the volume If you delete the volume, the volume and all the information it contains is removed. The resulting unallocated space is then available for new volumes.
■Remove the mirror If you remove the mirror, the mirror is broken and the space on one of the disks becomes unallocated. The other disk maintains a copy of the data that had been mirrored, but that data is of course no longer fault-tolerant.
■Break the mirror If you break the mirror, the mirror is broken but both disks maintain copies of the data. The portion of the mirror that you select when you choose Break Mirror maintains the original mirrored volume’s drive letter, shared folders, paging file, and reparse points. The secondary drive is given the next available drive letter.
Knowing that information, how do you suppose you would replace a failed disk—a member of the mirrored volume that simply died? Well, after physically replacing the disk, you will need to open Disk Management to rescan, initialize the disk and convert it to dynamic. After all that work you will find that you can’t remirror a mirrored volume, even though half of it doesn’t exist. So far as the remaining disk is concerned, the mirrored volume still exists—its partner in redundancy is just out to lunch. You must remove the mirror to break the mirror. Right-click the mirror and choose Remove Mirror. In the Remove Mirror dialog box, it is important to select the half of the volume that is missing; the volume you select will be deleted when you click Remove Mirror. The volume you did not select will become a simple volume. Once the operation is complete, right-click the healthy, simple volume and choose Add Mirror. Select the new disk and the mirror will be created again.
RAID-5 Volumes
A RAID-5 volume uses three or more physical disks to provide fault tolerance and excellent read performance while reducing the cost of fault tolerance in terms of disk capacity. Data is written to all but one disk in a RAID-5. That volume receives a chunk of data, called parity, which acts as a checksum and provides fault tolerance for the stripe. The calculation of parity during a write operation means that RAID-5 is quite intensive on the server’s processor for a volume that is not read-only. RAID-5 provides improved read performance, however, as data is retrieved from multiple spindles simultaneously.
As data in a file is written to the volume, the parity is distributed among each disk in the set. But from a storage capacity perspective, the amount of space used for fault tolerance is the equivalent of the space used by one disk in the volume.
From a storage capacity perspective, that makes RAID-5 more economical than mirroring. In a minimal, three disk RAID-5 volume, one-third of the capacity is used for parity, as opposed to one-half of a mirrored volume being used for fault tolerance. Because as many as 32 disks can participate in a RAID-5 volume, you can theoretically configure a fault-tolerant volume which uses only 1/32 of its capacity to provide fault tolerance for the entire volume.
Configure RAID-5 Volumes
You need to have space on at least three dynamic disks to be able to create a RAID-5 volume. Right-click one disk’s unallocated space and choose New Volume. The New Volume Wizard will step you through selecting a RAID-5 volume type, and then selecting the disks that will participate in the volume.
The capacity of the volume is limited to the smallest section of unallocated space on any one of the volume’s disks. If Disk 2 has 50 GB of unallocated space, but Disks 3 and 4 have 100 GB of unallocated space, the stripe can only use 50 GB of space on Disks 3 and 4—the space used on each disk in the volume is identical. The capacity, or Volume Size reported by the New Volume Wizard will represent the amount of space available for data after accounting for parity. To continue our example, the RAID-5 volume size would be 100 GB—the total capacity minus the equivalent of one disk’s space for parity.
RAID-5 volumes can be assigned a drive letter or folder paths. They can be formatted only with NTFS.
Because RAID-5 volumes are created as native dynamic volumes from unallocated space, you cannot turn any other type of volume into a RAID-5 volume without backing up that volume’s data and restoring into the new RAID-5 volume.
Recovering a Failed RAID-5 Volume
If a single disk fails in a RAID-5 volume, data can continue to be accessed. During read operations, any missing data is regenerated on the fly through a calculation involving remaining data and parity information. Performance will be degraded and, of course, if a second drive fails it’s time to pull out the backup tapes. RAID-5 and mirrored volumes can only sustain a single drive failure.
If the drive is returned to service, you may need to rescan, and then you will need to right-click the volume and choose Reactivate Volume. The system will then rebuild missing data and the volume will be fully functional again.
If the drive does not offer a Reactivate option, or if you have had to replace the disk, you may need to rescan, initialize the disk, convert it to dynamic, then right-click the volume and choose Repair Volume. You will be asked to select the disk where the missing volume member should be recreated. Select the new disk and the system will regenerate the missing data.
Mirrored Volumes versus RAID-5 Volumes
Mirrored volumes (RAID-1) and RAID-5 volumes provide different levels of fault tolerance. Deciding which option to implement depends on the level of protection you require and the cost of hardware. The major differences between mirrored volumes and RAID-5 volumes are performance and cost. Below Table describes some differences between software-level RAID-1 and RAID-5.
TABLE: RAID Performance And Costs

Creating Fault Tolerance for the System Volume
Because RAID-5 is a native dynamic volume, it is not possible to install or start the Windows Server 2003 operating system on a RAID-5 volume created by the Windows Server 2003 fault-tolerant disk technologies.
The only option for creating fault tolerance for the system, without buying hardware RAID, is thus to mirror the system volume. You can mirror the system volume by following the procedures described for creating a mirrored volume: right-click the system volume and choose Add Mirror. Unlike Windows 2000, you do not need to restart, and the BOOT.INI file is updated automatically so that you can start to the secondary drive if the primary drive fails.
If the drives are attached to IDE controllers, and the primary drive fails, you may have to remove that drive, change the secondary drive to the primary controller and set its jumpers or cable position so that it is the master. Otherwise, the system may not boot to the secondary drive.
Tuesday, September 28, 2010
Maintaining Disk Storage Volumes
Windows Server 2003 disk volumes are efficient and stable if formatted with NTFS, but somewhat less so when formatted with FAT or FAT32. The NTFS file system logs all file transactions, replaces bad clusters automatically, and stores copies of key information for all files on the NTFS volume. With these mechanisms, NTFS actively protects the integrity of the volume structure and the file system metadata (the data related to the file system itself). User data, however, can occasionally be corrupted, and can certainly become fragmented. Users also have the annoying habit of storing enormous amounts of archaic and non-business data on volumes to which they have access. In this topic, you will learn how to maintain the integrity of disk volumes and to optimize those volumes by performing defragmentation and by setting storage limits through disk quotas.
CHKDSK
CHKDSK, or “Check Disk”, is a tool available in Windows Explorer or from the command-line that allows you to scan a disk volume for file system errors and, option-ally, to test for and attempt to recover bad sectors on your hard disk.
To use Check Disk from Windows Explorer, open the properties dialog box for the volume you want to check. On the Tools tab, click Check Now. In the Check Disk dialog box, as shown in below Figure , select the tasks you wish to launch.

When you select Automatically Fix File System Errors, Check Disk will attempt to fix inconsistencies in the file system catalog, such as files that appear in the catalog but don’t appear in a directory on the volume. Check Disk makes three passes over the drive to examine the metadata, which is the data describing how files are organized on the disk. The passes attempt to ensure that all files on the volume are consistent with the master file table (MFT), that the directory structure is correct, and that the security descriptors are consistent.
If you select Scan For And Attempt Recovery Of Bad Sectors, Check Disk makes a fourth pass which tests the sectors in the volume reserved for user data (as opposed to file system metadata, which is always checked). If a bad sector is found, data is recovered and moved to a good sector if the volume is fault-tolerant; if the volume is not fault-tolerant, data cannot be recovered using Check Disk and must be restored from backup. The bad sector is then removed from active use and future data will not be written to the sector.
All files with open handles must be closed before Check Disk can run. If all handles cannot be released (which will be the case if you run Check Disk against a system volume), you will be prompted to schedule Check Disk to run when the system is restarted. When Check Disk is running, the volume will be inaccessible to other processes. Depending on the size of the volume, the check options you have selected, and the other processes running on the computer, Check Disk can take a significant amount of time to complete, and it is quite processor-and disk-intensive while it runs.
Check Disk can also be run from the command prompt using CHKDSK. Without switches, CHKDSK runs in read-only mode on the current drive. You’ll see a report showing disk space usage. CHKDSK supports several switches allowing you to fix file system errors (/f) and bad sectors (/r), just like the Explorer version.
Disk Defragmenter
Files are stored on a volume in units called clusters. Cluster size is configured when for-matting a drive; many NTFS volumes use a default cluster size of 4 KB. Each cluster can only contain one file, even if that file is smaller than the cluster size. If a file is larger than the cluster size, the file is saved to multiple clusters, with each cluster containing a pointer to the next segment of the file. When a drive is new, all clusters are free, so as files are written to the drive they tend to occupy physically adjacent clusters. But quickly, as files are deleted or expanded and contracted in size, free clusters are no longer completely contiguous, so a file may be saved to several clusters that are not physically close to each other on the disk drive. This fragmentation of a file results in slower read and write performance and, over time, fragmentation of multiple files on a server can degrade performance significantly.
Windows Server 2003 provides a defragmenter toolset—both a command-line and a graphical utility—with which volumes can be analyzed and defragmented. The tools are significantly improved over Windows 2000, as they can now defragment volumes with cluster sizes greater than 4 KB, and can defragment the master file table. You can use the tools to defragment any local disk volume. But to schedule defragmentation, or to defragment a remote volume, you must look for a third-party tool such as Diskeeper from Executive Software.
To use the built-in Disk Defragmenter, as shown in below Figure, open the properties of a disk volume and, from the Tools tab, click Defragment Now. Alternatively, open the Disk Defragmenter snap-in in the Computer Management console or a custom Microsoft Management Console. Select a volume and click Analyze. The tool will display a recommendation. If the tool indicates that the volume is dirty, there may be corruption and CHKDSK should be run before defragmenting.

If the recommendation is to defragment, click Defragment. You can defragment any type of volume: FAT or NTFS, basic or dynamic. The volume can have open files, but open files may not be efficiently defragmented and may slow the process, so it is recommended to close all open files before defragmenting. Disk Defragmenter will move files around the drive in an attempt to collect all clusters of a file into contiguous clusters. The result will also consolidate free space, making it less likely that new files will be fragmented.
Disk Quotas
Windows 2000 introduced quota management as a built-in feature, allowing adminis¬trators to implement storage limits without an investment in third-party utilities. Windows Server 2003 supports the same functionality. When quotas are enabled, quota manager tracks the files on a volume that are owned by a user. It then compares the calculated total of disk usage by that user to limits that have been configured by an administrator and, when those limits are reached, notifies the user that the volume is near quota, or prevents the user from writing to the disk, or both.
Quota manager reports the amount of free space on a volume based on the user’s quota, so if a user has a 50 MB quota on a 500 GB RAID volume, the user will see free space reported as 50 MB when the user first accesses the volume. When the user approaches the quota limit, the messages that appear are similar to a volume that is filling up or is full; the system warns that space is low and suggests deleting unneeded files.
Configure Quotas
Configuring quotas requires the following steps: enabling quotas on a volume, configuring default quota settings, and configuring quota entries for exceptions to the default.
Quotas are disabled by default in Windows Server 2003, and must be enabled on a volume-by-volume basis. To enable quotas, open the properties of the volume and click the Quota tab. The Quota properties of a volume are shown in below Figure.
Select the Enable Quota Management check box. If you want to deny users who have exceeded their limit the ability to write additional files to the volume, select Deny Disk Space To Users Exceeding Quota Limit. If this box is not selected, users can continue to write to the volume.

Quotas are managed in two ways: first, by quota entries for specific users, setting a storage limit for each user (or setting “no limit” for a user), and second, by default quota settings that apply to all users for whom a quota entry does not exist. On the Quota tab, you can configure the default quota settings. Configure a default limit or “no limit” that will apply to as many users as possible, so that you can minimize the num¬ber of quota entries you must create for users whose limits are different from this default. Note that you can configure the disk space limit as well as a warning level, which should obviously be lower than the limit.
Finally, specify logging options. Quota manager registers events in the System log, identifying the user by name and specifying that they have exceeded their warning or quota limits.
After configuring the defaults for the volume on the Quota tab, click Quota Entries to open the Quota Entries dialog box, as shown in below Figure.

Click the New, Quota Entry button on the toolbar or choose New Quota Entry on the Quota menu, and you can select one or more users for which to create a quota entry. It is unfortunate that Windows Server 2003 does not allow you to assign quota entries based on groups (as most third-party quota management tools do), but in the Select Users dialog box you can at least select multiple users before clicking OK. The limits you configure in the Add New Quota Entry dialog box will apply to all selected users, individually.
Exporting Quota Entries
If you want to apply the same quota entries to another NTFS volume, you can export the entries and import them to the other volume. Select one or more quota entries and, on the Quota menu, click Export. On the other volume, choose Import.
Monitoring Quotas and Storage
The Quota Entries dialog box displays disk storage per user and whether that storage is at or above warning levels or limits. You can sort by column to identify users who have exceeded their quota levels or limits. There is no mechanism to alert you about quota limits, so you must monitor the Quota Entries dialog box or the System Log in Event Viewer.
CHKDSK
CHKDSK, or “Check Disk”, is a tool available in Windows Explorer or from the command-line that allows you to scan a disk volume for file system errors and, option-ally, to test for and attempt to recover bad sectors on your hard disk.
To use Check Disk from Windows Explorer, open the properties dialog box for the volume you want to check. On the Tools tab, click Check Now. In the Check Disk dialog box, as shown in below Figure , select the tasks you wish to launch.
When you select Automatically Fix File System Errors, Check Disk will attempt to fix inconsistencies in the file system catalog, such as files that appear in the catalog but don’t appear in a directory on the volume. Check Disk makes three passes over the drive to examine the metadata, which is the data describing how files are organized on the disk. The passes attempt to ensure that all files on the volume are consistent with the master file table (MFT), that the directory structure is correct, and that the security descriptors are consistent.
If you select Scan For And Attempt Recovery Of Bad Sectors, Check Disk makes a fourth pass which tests the sectors in the volume reserved for user data (as opposed to file system metadata, which is always checked). If a bad sector is found, data is recovered and moved to a good sector if the volume is fault-tolerant; if the volume is not fault-tolerant, data cannot be recovered using Check Disk and must be restored from backup. The bad sector is then removed from active use and future data will not be written to the sector.
All files with open handles must be closed before Check Disk can run. If all handles cannot be released (which will be the case if you run Check Disk against a system volume), you will be prompted to schedule Check Disk to run when the system is restarted. When Check Disk is running, the volume will be inaccessible to other processes. Depending on the size of the volume, the check options you have selected, and the other processes running on the computer, Check Disk can take a significant amount of time to complete, and it is quite processor-and disk-intensive while it runs.
Check Disk can also be run from the command prompt using CHKDSK. Without switches, CHKDSK runs in read-only mode on the current drive. You’ll see a report showing disk space usage. CHKDSK supports several switches allowing you to fix file system errors (/f) and bad sectors (/r), just like the Explorer version.
Disk Defragmenter
Files are stored on a volume in units called clusters. Cluster size is configured when for-matting a drive; many NTFS volumes use a default cluster size of 4 KB. Each cluster can only contain one file, even if that file is smaller than the cluster size. If a file is larger than the cluster size, the file is saved to multiple clusters, with each cluster containing a pointer to the next segment of the file. When a drive is new, all clusters are free, so as files are written to the drive they tend to occupy physically adjacent clusters. But quickly, as files are deleted or expanded and contracted in size, free clusters are no longer completely contiguous, so a file may be saved to several clusters that are not physically close to each other on the disk drive. This fragmentation of a file results in slower read and write performance and, over time, fragmentation of multiple files on a server can degrade performance significantly.
Windows Server 2003 provides a defragmenter toolset—both a command-line and a graphical utility—with which volumes can be analyzed and defragmented. The tools are significantly improved over Windows 2000, as they can now defragment volumes with cluster sizes greater than 4 KB, and can defragment the master file table. You can use the tools to defragment any local disk volume. But to schedule defragmentation, or to defragment a remote volume, you must look for a third-party tool such as Diskeeper from Executive Software.
To use the built-in Disk Defragmenter, as shown in below Figure, open the properties of a disk volume and, from the Tools tab, click Defragment Now. Alternatively, open the Disk Defragmenter snap-in in the Computer Management console or a custom Microsoft Management Console. Select a volume and click Analyze. The tool will display a recommendation. If the tool indicates that the volume is dirty, there may be corruption and CHKDSK should be run before defragmenting.
If the recommendation is to defragment, click Defragment. You can defragment any type of volume: FAT or NTFS, basic or dynamic. The volume can have open files, but open files may not be efficiently defragmented and may slow the process, so it is recommended to close all open files before defragmenting. Disk Defragmenter will move files around the drive in an attempt to collect all clusters of a file into contiguous clusters. The result will also consolidate free space, making it less likely that new files will be fragmented.
Disk Quotas
Windows 2000 introduced quota management as a built-in feature, allowing adminis¬trators to implement storage limits without an investment in third-party utilities. Windows Server 2003 supports the same functionality. When quotas are enabled, quota manager tracks the files on a volume that are owned by a user. It then compares the calculated total of disk usage by that user to limits that have been configured by an administrator and, when those limits are reached, notifies the user that the volume is near quota, or prevents the user from writing to the disk, or both.
Quota manager reports the amount of free space on a volume based on the user’s quota, so if a user has a 50 MB quota on a 500 GB RAID volume, the user will see free space reported as 50 MB when the user first accesses the volume. When the user approaches the quota limit, the messages that appear are similar to a volume that is filling up or is full; the system warns that space is low and suggests deleting unneeded files.
Configure Quotas
Configuring quotas requires the following steps: enabling quotas on a volume, configuring default quota settings, and configuring quota entries for exceptions to the default.
Quotas are disabled by default in Windows Server 2003, and must be enabled on a volume-by-volume basis. To enable quotas, open the properties of the volume and click the Quota tab. The Quota properties of a volume are shown in below Figure.
Select the Enable Quota Management check box. If you want to deny users who have exceeded their limit the ability to write additional files to the volume, select Deny Disk Space To Users Exceeding Quota Limit. If this box is not selected, users can continue to write to the volume.

Quotas are managed in two ways: first, by quota entries for specific users, setting a storage limit for each user (or setting “no limit” for a user), and second, by default quota settings that apply to all users for whom a quota entry does not exist. On the Quota tab, you can configure the default quota settings. Configure a default limit or “no limit” that will apply to as many users as possible, so that you can minimize the num¬ber of quota entries you must create for users whose limits are different from this default. Note that you can configure the disk space limit as well as a warning level, which should obviously be lower than the limit.
Finally, specify logging options. Quota manager registers events in the System log, identifying the user by name and specifying that they have exceeded their warning or quota limits.
After configuring the defaults for the volume on the Quota tab, click Quota Entries to open the Quota Entries dialog box, as shown in below Figure.
Click the New, Quota Entry button on the toolbar or choose New Quota Entry on the Quota menu, and you can select one or more users for which to create a quota entry. It is unfortunate that Windows Server 2003 does not allow you to assign quota entries based on groups (as most third-party quota management tools do), but in the Select Users dialog box you can at least select multiple users before clicking OK. The limits you configure in the Add New Quota Entry dialog box will apply to all selected users, individually.
Exporting Quota Entries
If you want to apply the same quota entries to another NTFS volume, you can export the entries and import them to the other volume. Select one or more quota entries and, on the Quota menu, click Export. On the other volume, choose Import.
Monitoring Quotas and Storage
The Quota Entries dialog box displays disk storage per user and whether that storage is at or above warning levels or limits. You can sort by column to identify users who have exceeded their quota levels or limits. There is no mechanism to alert you about quota limits, so you must monitor the Quota Entries dialog box or the System Log in Event Viewer.
Monday, September 27, 2010
Configuring Disks and Volumes
In this topic, you will apply the concepts of disk storage to the actual skills needed to install, configure, and manage disk storage. You will learn how to use the Disk Management tool to direct the detection and initialization of newly installed disks, and to apportion that disk to partitions, logical drives, and volumes. In the event that a volume fills up, you will learn how to extend that volume’s capacity. And you will explore the processes involved with moving disks between servers. Finally, you will uncover the powerful new DISKPART command, which allows you to manage storage from the command line.
Disk Management
Disk management activities are performed using the cleverly named Disk Management snap-in, which is part of the Computer Management console. Open the Disk Management snap-in in the Computer Management console, or add the snap-in to a custom console.
Disk Management can manage disk storage on local or remote systems. The snap-in does not manipulate disk configuration directly; rather, it works in concert with Dmadmin, the Logical Disk Manager Administrative Service that is started on the computer you are managing when you start the Disk Management snap-in.
The Disk Management interface is shown in below Figure. The top frame—the list view—displays information about each partition, logical drive, or volume. The bottom frame—the graphical view—depicts disk space allocation per physical disk, as perceived by Windows Server 2003. You can right-click the volumes in either frame to access a shortcut menu to format, delete, or assign a drive letter to the volume. If you right-click an area of unallocated disk space, you can create a partition or volume. By right-clicking the disk drive’s status box, on the left of the disk’s graphical view, you can initialize a new disk, convert between basic and dynamic disks, and access the disk’s hardware properties dialog box.

Configuring Disks and Volumes
Configuring storage entails the following steps:
1. Physically installing the disk(s).
2. Initializing the disk.
3. On a basic disk, creating partitions and (if an extended partition) logical drives or, on a dynamic disk, creating volumes.
4. Formatting the volumes.
5. Assigning drive letters to the volumes, or mounting the volumes to empty folders on existing NTFS volumes.
You must be a member of the Administrators or Backup Operators group, or have been otherwise delegated authority, to perform these tasks, although only administrators can format a volume.
Installing the Disk
To add a new disk to a computer, install or attach the new physical disk (or disks). Open Disk Management and, if the drive has not been detected automatically, right click the Disk Management node and choose Rescan Disks. If a system must be taken offline to install a new disk, restart the computer, then open Disk Management. If the new disks are not automatically detected, rescan the disks.
Initializing the Disk
When you add a disk to a server, you will need to initialize that disk before you can begin to allocate its available space to partitions, logical drives, and volumes. Initializing a disk allows the operating system to write a disk signature, the end of sector marker (also called signature word), and an MBR or globally unique identifier (GUID) partition table to the disk.
If you start the Disk Management console after installing a new disk, the Initialize Disk Wizard will appear automatically. To initialize a disk manually using Disk Management, right-click the disk’s status box and choose Initialize Disk.
Creating Partitions and Volumes
After you have initialized the disk, you can begin to implement a storage structure of partitions, logical drives, or volumes.
A newly initialized disk is configured by default as a basic disk. If you wish to maintain the disk as a basic disk, you can divide the basic disk into primary and extended partitions by right-clicking unallocated space and choosing New Partition. If you choose to create a primary partition, the partition becomes a logical volume. After creating an extended partition, right-click the partition again and choose New Logical Drive. As you’ll remember from earlier discussions, logical drives are logical volumes on an extended partition.
If you want to configure the disk as a dynamic disk, right-click the disk’s status box in Disk Management and choose Convert To Dynamic Disk. You can then right-click the unallocated space on the disk and choose New Volume. The New Volume Wizard will step you through the creation of supported volume types. The Select Volume Type page of the wizard is shown in below Figure.

You can convert an existing basic disk to a dynamic disk—a solution that will be discussed later in this lesson.
Formatting Volumes
Windows Server 2003 supports three file systems: FAT, FAT32, and NTFS. Let’s keep this discussion simple: use FAT or FAT32 only when you have very specific reasons for doing so. Only NTFS gives you the level of stability, resiliency, scalability, flexibility and security required by most organizations. Many core components of Windows Server 2003, such as file security, and services, including Active Directory and Remote Installation Services (RIS), require NTFS. All advanced storage management tasks, including multidisk volumes and disk quotas require NTFS. If you think you need FAT32, think again, then think again.
Assigning Drive Letters or Mounting Volumes
When you create a volume, it defaults to the next available drive letter. The New Volume Wizard and New Partition Wizard give you a chance to specify an alternative representation for the new logical volume. You can also right-click an existing volume and choose Change Drive Letter and Paths.
A volume can be represented by only one drive letter, though you can configure a volume to have no drive letter. However, you can mount a volume in one or more empty folders on local NTFS volumes. In the Change Drive Letter And Paths dialog box, you can click Remove or Change to delete or modify an existing drive letter or folder mounting for the volume.
Click Add to add a drive letter or mount point. Below Figure shows a server in which the Docs folder on the X drive is a mount point to another volume. Note that the folder appears in the Explorer namespace exactly where it should, but displays a drive volume icon. When a user navigates to that folder, the user is transparently redirected to the volume.

Mounting a volume in a folder on an existing volume effectively increases the target volume’s size and free space. You can mount volumes regardless of whether the volumes involved are on basic or dynamic disks, and regardless of what type of volume they are. But the empty folder, the path of which becomes the path to the mounted volume, must reside on an NTFS volume. The mounted volume can, technically, be formatted as FAT or FAT32, but of course that is not the best practice.
Extending Volumes
Another way to increase a volume’s capacity is to extend the volume. You can extend a simple or spanned volume on a dynamic disk so long as that volume is formatted as NTFS, and so long as the volume is not the system or boot volume. Right-click the volume and click Extend Volume. Follow the Extend Volume Wizard’s instructions screen to select unallocated space on dynamic disks on which to extend the existing volume. If you extend a simple volume onto space on another physical disk, you create a spanned volume.
You can extend a partition on a basic disk using the DISKPART command. The basic partition must be formatted as NTFS, must not be the system or boot partition, and must be extended onto immediately contiguous space on the same physical disk that is either unallocated and unformatted, or formatted with NTFS.
Moving Disks Between Servers
It is possible to move disks between computers. If, for example, you plan to take a server offline, you might attach its physical disks to another server so that data can continue to be accessed. The process for doing so is the following:
1. Check the health of the disk while it is in the original server. It is recommended to open Disk Management and confirm that the disk status displays Healthy before moving the disk. If the disk is not healthy, repair the disk.
2. Uninstall the disk in the original computer. If the original server is online, uninstall the disk by right-clicking the disk in Device Manager and choosing Uninstall.
3. Remove a dynamic disk correctly. If the original server is online, open Disk Management, right-click the dynamic disk and choose Remove. This step is not necessary or possible with basic disks.
4. Physically detach the disk. If the computer supports hot-swapping the drive, you may remove the drive. Otherwise, shut down the computer to remove the physical disk.
5. Attach the disk to the target server. Open Disk Management and, if the drive has not been detected automatically, right click the Disk Management node and choose Rescan Disks. Otherwise, shut down the target server before adding the physical disk.
6. Follow instructions in the Found New Hardware Wizard. If the wizard does not appear, open Device Manager and see if the drive was detected and installed auto¬matically. If not, open Add Hardware from Control Panel.
7. Open Disk Management. Right-click Disk Management and choose Rescan Disks.
8. Right-click any disk marked Foreign and choose Import Foreign Disks. Importing a disk reconciles the LDM databases on a new dynamic disk with the existing disks.
Some important notes about moving physical disks:
■If an imported disk contains volumes that span to other physical disks, you must attach and import all physical disks before the volumes can be accessed.
■If you move drives from several computers to a single computer, move all drives from one computer before beginning to move drives from the next computer.
■A basic volume that is moved to a new computer receives the next available drive letter. Dynamic volumes retain the drive letter they had on the original computer. If a dynamic volume did not have a drive letter on the previous computer, it does not receive a drive letter when moved to another computer. If the drive letter is already used on the computer where they are moved, the volume receives the next available drive letter.
■Use the Mountvol /n or the DISKPART automount commands to prevent new vol¬umes from being automatically mounted and assigned a drive letter. If these commands have been used, when you add a new disk you must manually mount the volumes and assign drive letters or paths.
Converting Disk Storage
You can convert a basic disk to a dynamic disk. If the disk already contains partitions and logical drives, those units will be converted to the equivalent units for a dynamic disk: simple volumes. The structure of data on the disk is not modified, so it is possible to convert a basic disk that already contains data, although it is always best practice to back up volumes before performing disk management tasks.
To convert a basic disk to a dynamic disk, right-click the disk’s status box and choose Convert To Dynamic Disk. It’s that simple. If you convert a disk that contains a system or boot partition, the computer must restart.
Unfortunately, the reverse process is not as straightforward. Converting back to basic storage wipes out data on the drive. So you must first back up all data on the disk. Then you must delete all existing volumes on the dynamic disk before right-clicking the disk’s status box in Disk Management and choosing Convert To Basic Disk. After recreating partitions and logical drives, restore the data onto the disk. Although you can convert from dynamic to basic from a technical perspective, you are actually wiping out the disk and starting over.
Performing Disk Management Tasks from the Command Prompt
Windows Server 2003 provides command-line alternatives for disk management, including the following:
■ Chkdsk Scan a disk for errors and, optionally, attempt to correct those errors.
■ Convert Convert a volume from FAT or FAT32 to NTFS.
■ Fsutil Perform a variety of tasks related to managing FAT, FAT32, or NTFS volumes.
■ Mountvol Manages mounted volumes and reparse points.
But the granddaddy of disk management command-line tools is DISKPART. Below Table summarizes the DISKPART commands that achieve common disk management tasks. Diskpart can be used interactively or can call a script. To start Diskpart interactively, type diskpart at the command prompt. When the Diskpart command prompt (DISKPART >) appears, type ? at any time for help. The command’s built-in documentation will appear automatically when needed to help you achieve the tasks you per-form. Diskpart is also well documented in the Help And Support Center.
Table: how to complete Commaon Disk Management tasks from the Command Prompt

Friday, September 24, 2010
Understanding Disk Storage Options
Before you tackle the installation of a disk drive and the configuration of that drive, you must understand several important storage concepts. This topic will introduce you to the concepts, technologies, features, and terminology related to disk storage in Windows Server 2003. You will learn about differences between basic and dynamic disk storage types, and the variety of logical volumes they support.
Physical Disks
Physical disks are the conglomeration of plastic, metal, and silicon that enable users to store enormous quantities of useless data and MP3s, and the occasional business document. Of course I’m being sarcastic here, but it is important to understand the difference between the physical disk, and its logical volume(s), which are discussed in the next paragraph. It is also helpful to remember that an advanced disk subsystem, such as hardware-based redundant array of independent disks (RAID) system, may consist of several physical disks, but its dedicated hardware controllers abstract the physical composition of the disk set so that Windows Server 2003 perceives and represents the disk system as a single physical disk.
Logical Volumes
A logical volume is the basic unit of disk storage that you configure and manage. A logical volume may include space on more than one physical disk. Logical volumes (also called logical disks in the context of performance monitoring) are physically distinct storage units, allowing the separation of different types of information, such as the operating system, applications, and user data. Logical volumes have traditionally been represented by a single drive letter.
As you dig into disk-related terminology, you will learn about partitions, logical drives, and volumes. Many resources will use all these terms interchangeably, which is possible because the technical distinctions between the terms are minuscule, and the user interface and command-line tools guide you clearly by exposing only the appropriate type of logical volume based on the task you are performing. Don’t get too hung up on the distinctions between the terms; they will become clear through experience if not through analysis.
Mounted Volumes
You noticed that we said, “Logical volumes have traditionally been represented by a single drive letter.” That structure severely limited (to 26, says my kindergarten teacher) the number of volumes you could create on a system, and the flexibility with which those volumes could be used. Windows Server 2003’s NTFS file system allows you to assign one or no drive letter to a volume. In addition, you can mount a volume to one or more empty folders on existing NTFS volumes. For example, you might create an empty folder Docs, on an existing volume with the drive letter X:, and mount a new 120 GB logical volume to that folder. When users navigate to X:\Docs, the disk sub-system redirects the input/output (I/O) requests to the new volume. All of this is trans-parent to the user.
The possibilities using this powerful feature are, as they say, “limitless.” By mounting a volume to a folder path, you can extend the available drive space on an existing volume. If the existing volume is not fault-tolerant, but the new volume is fault-tolerant, the folder to which the volume is mounted, X:\Docs, represents a fault-tolerant portion of the existing volume’s namespace. You could, theoretically, mount all logical vol¬umes on a server to folders on the server’s C or D drive and thereby unify enormous storage capacity under the namespace of a single drive letter.
Fault Tolerance
Fault tolerance refers to a system’s ability to continue functioning when a component—in this case, a disk drive—has failed. Windows Server 2003 allows you to create two types of fault-tolerant logical volumes: mirrored (RAID-1) and striped with parity (RAID-5). You will learn more about the details of these configurations later in the chapter, but it is important to remember several facts about Windows Server 2003 fault tolerance, often called software RAID:
■ In fault-tolerant disk configurations, two or more disks are used, and space is allocated to store data that will enable the system to recover in the event of a single drive failure.
■ The fault tolerance options supported by Windows Server 2003 do not provide a means for a disk volume to continue functioning if two or more disks fail.
■ The operating system allows you to use any two or more disk drives to create fault-tolerant volumes. You do not have to purchase any additional hardware or software to benefit immediately from fault-tolerant server configurations. However, if you use Windows Server 2003 mirrored or RAID-5 volumes, it is best practice to use similar or identical disk drives on the same bus. Combining a variety of disk hardware, or using drives connected to a variety of small computer systems inter-face (SCSI) or Integrated Device Electronics (IDE) buses can affect performance significantly.
■ Speaking of performance, Windows Server 2003 fault tolerance is using processor cycles and other server resources to manage the volumes. RAID-5 can be particularly detrimental to server performance. It is possible, and affordable these days, to purchase hardware-based fault-tolerant disk arrays, known as hardware RAID. Hardware RAID uses dedicated controllers to manage fault tolerance, and such systems are generally faster and more flexible in both management and recovery than is Windows Server 2003 RAID.
■ Because hardware RAID controllers offload the management duties from the operating system, a hardware RAID array appears to Windows Server 2003 as a single disk.
Separation of Data
It is a good idea to analyze storage requirements carefully before configuring the disk subsystem of a server. Administrators typically elect to install the operating system on a logical volume separate from applications and data. By isolating the operating system, it is easier to secure the operating system volume and to manage disk space so that the volume does not run out of space. It is also usual to configure some kind of fault tolerance for the operating system.
Applications are generally stored in a separate volume, and user data and files in a third. Again, isolation of data types allows you to manage security, performance, and fault tolerance separately for each data type. If an application uses a transaction log to prepare entries into a database, as do Microsoft Active Directory directory service and Microsoft Exchange Server, it is typical to store those logs in volumes that reside on physical disks separate from the database itself, allowing the application to rebuild the database from the logs if the database fails.
Once you have thoroughly analyzed your storage requirements as they relate to the data type, security, performance, and fault tolerance, you can begin to determine how many disks you require and how those disks should be configured.
Basic and Dynamic Disks
An operating system must have a way to make sense of the physical space on a disk drive. There are two structures that Windows Server 2003 can apply to help it apportion and allocate drive space: basic and dynamic storage, also called basic and dynamic disks.
Basic Disks, Partitions, and Logical Drives
Basic disks maintain the structure with which you are probably most familiar. Each basic disk is partitioned, and each partition functions as a physically separate unit of storage. The information about the location and size of each partition is stored in the partition table of the Master Boot Record (MBR) on the drive. A basic disk can contain as many as four partitions, consisting of either four primary partitions or three primary partitions and one extended partition.
The logical volumes on a basic disk are primary partitions and logical drives. The logical volume, as mentioned, can be represented by zero or more drive letters and can be mounted to folders on an existing NTFS volume.
■ Primary partition Each primary partition maintains one logical volume on a basic disk. If a basic disk is used to start the operating system, one and only one primary partition on the disk must also be marked as active.
■ Extended partition A basic disk may also contain an extended partition. Unlike primary partitions, extended partitions are not formatted or assigned drive letters. Instead, extended partitions are further divided into logical drives. Logical drives are logical volumes on a basic disk.
In earlier versions of Microsoft operating systems, including Windows 95, Windows 98, and MS-DOS, the operating system could only “see” the primary partition on which it was installed, plus the extended partition on the drive, if one existed. If you wanted additional storage segments on the drive, you had to configure an extended partition and apportion it into one or more logical drives. Because Windows NT, Windows 2000, Windows XP, and Windows Server 2003 can access all partitions on a disk, you only need an extended partition if you want more than four logical drives on a single disk.
Dynamic Disks and Volumes
Microsoft Windows 2000, Windows XP, and the Windows Server 2003 family also sup-port dynamic storage. The storage units on dynamic disks are called volumes, and the first distinctions between basic and dynamic storage are that dynamic disks support an unlimited number of volumes, and that the configuration information about the volumes is stored in a database controlled by the Logical Disk Manager (LDM) service.
The logical volume of dynamic disks is the volume. Dynamic disks support simple volumes on a single disk. When a computer has more than one dynamic disk, you are provided more storage options from which to choose. Spanned, mirrored (RAID-1), striped (RAID-0), and striped with parity (RAID-5) volumes are logical volumes that utilize space on more than one physical disk. Each volume type uses disk space differently, and is characterized by a different level of fault tolerance. The list below summarizes the volume types, though each has nuances you will learn about as the topic progresses.
■ Simple volume The equivalent to a basic disk partition is a dynamic disk simple volume. Simple volumes utilize space on a single physical disk, and correspond to a single logical volume. Simple volumes can be extended by appending unallocated space on other regions of the same disk, allowing you to adjust a volume’s capacity with the growth of data stored in that volume. Because simple volumes exist on only one physical disk, they are not fault-tolerant.
■ Spanned volume A spanned volume includes space on more than one physical disk. Up to 32 physical disks can participate in a spanned volume, and the amount of space used on each disk can be different. Data is written to the volume beginning with the space on the first disk in the volume. When the space on the first disk fills, the second disk is written to, and so on. Spanned volumes provide an option for increasing drive capacity. If a simple or spanned volume is filling up, you can extend the volume onto additional new storage capacity.
But spanned volumes are not fault-tolerant, and cannot participate in any fault-tolerant configurations. Because their size tends to be greater, and because multiple physical disks are involved, the risk for failure increases. If any one disk in a spanned volume is corrupted or lost, data on the entire volume is lost as well. For these reasons, Windows Server 2003 will not allow the installation of the operating system on a spanned volume, nor can you extend or span the system volume. Spanned volumes are recommended only as a stop-gap measure when an existing volume fills to capacity, or else in situations where tolerance for failure is high— for example, a large library of read-only data that can easily be restored from tape backup in the event of failure.
■ Striped volume A striped volume (RAID-0) combines areas of free space from multiple hard disks into one logical volume. Unlike a spanned volume, however, data is written to all physical disks in the volume at the same rate. Because multiple spindles are in use, read and write performance is increased almost geometrically as additional physical disks are added to the stripe. But like extended simple volumes and spanned volumes, if a disk in a striped volume fails, the data in the entire volume is lost.
■ Mirrored volume A mirrored volume (also known as RAID Level 1, or RAID-1) consists of two identical copies of a simple volume, each on a separate hard disk. Mirrored volumes provide fault tolerance in the event that one physical disk fails.
■ RAID-5 volume A RAID-5 volume is a fault-tolerant striped volume. Space on three or more physical disks is unified as a single volume. Data is written to all physical disks at the same rate, but unlike a striped volume, the data is interlaced with checksum information, called parity. Should a single disk in the volume fail, the data on that disk can be regenerated through calculations involving the remaining data and the checksum information. It is an interesting technical note that parity is distributed among all volumes in the RAID-5 set.
Basic vs. Dynamic Disks
So now that you know about basic and dynamic storage, and the types of partitions, logical drives, and volumes they support, which is better? The answer, as is frequently the case, is: “It depends.”
Dynamic disks that store data are easily transferred between servers, allowing you to move a disk from a failed server to a functioning server with little downtime. Dynamic disks flex their muscle when there is more than one dynamic disk in a computer. Each Windows 2000, Windows XP, and Windows Server 2003 computer can support one disk group, which itself can contain multiple dynamic disks. The LDM database is replicated among all disks in the disk group, which increases the resiliency of disk configuration information for all the group’s disks. In addition, disks can be configured to work together to create a variety of flexible and powerful volume types including spanned volumes, striped volumes (RAID-0), mirrored volumes (RAID-1), and striped-with-parity volumes (RAID-5).
Basic disks will continue to be used, however, for several reasons:
■ Basic storage is the default in Windows Server 2003, so all new disks are basic disks until you convert them to dynamic—a simple process you will learn in Lesson 2.
■ Dynamic disks do not offer advantages over basic disks in a computer that will have only one disk drive.
■ The behavior of the LDM database also makes it difficult to transfer a dynamic disk used for starting the operating system to another computer when the original computer fails.
■ Dynamic disks are not supported for removable media, and are not supported on laptops.
■ Basic storage is the industry standard, so basic drives are accessible from many operating systems, including MS-DOS, all versions of Microsoft Windows, and most non-Microsoft operating systems (there are a few). Therefore, dynamic disks cannot be used if you need to dual-boot an earlier operating system that requires access to the disks. Keep in mind that we are talking about local access only. When a client of any platform accesses files over the network, the underlying storage and volume type are transparent to the client.
Troubleshooting Hardware Devices and Drivers
Problems with drivers will arise, particularly when driver configuration is not possible through PnP means, or when core system component drivers are updated. When a device configuration is not possible through strictly PnP means, the chance of mismatching devices and their drivers increases. With core system component driver updates, which require a computer restart, any problems with the driver will not be known until the computer restarts.
Recovering from Device Disaster
Occasionally, when you install or upgrade a driver for a device, there is a problem with the functioning of that device on your system. Depending on the importance of the device, the effect of the problem will range from annoying to catastrophic. Particularly for such core system components as video drivers, a faulty configuration can render the computer unusable. Rolling back the driver, after all, is difficult if you cannot see the screen.
Thankfully, there are multiple methods of recovery from faulty driver configuration. The tools available are specifically suited to different purposes, and have varying chances of success. Tools that can be used in the event of incorrect driver configuration are listed in below Table
Table Driver Recovery Tools
 Device Manager Status Codes
When a device fails, an error message is usually reported in Device Manager with an exclamation point in a yellow icon next to the device. If you double-click the device (or right-click the device and then click Properties), a dialog box is displayed and any error messages that Device Manager detects are listed. This Device Status has some friendly text with it, but troubleshooting may require that you understand more than the text message delivers. Often, there is a code listed with the text that gives a better idea of how to troubleshoot the problem. These codes and suggested troubleshooting strategies are listed in below Table
Table Device Failure Troubleshooting
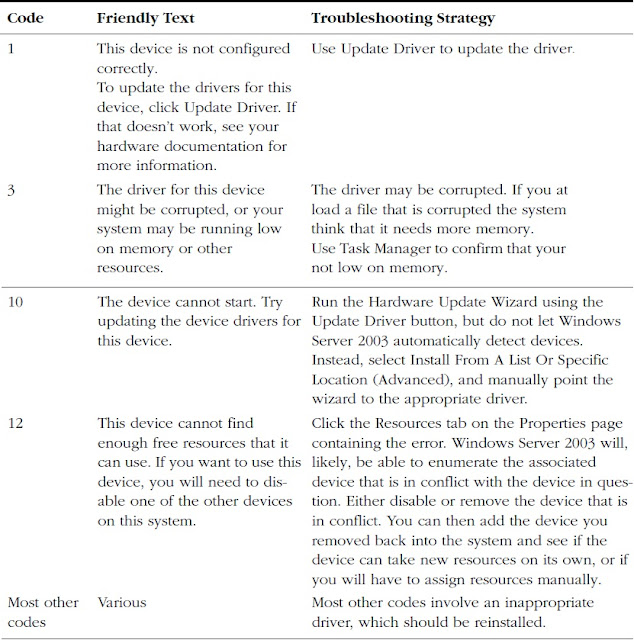
Recovering from Device Disaster
Occasionally, when you install or upgrade a driver for a device, there is a problem with the functioning of that device on your system. Depending on the importance of the device, the effect of the problem will range from annoying to catastrophic. Particularly for such core system components as video drivers, a faulty configuration can render the computer unusable. Rolling back the driver, after all, is difficult if you cannot see the screen.
Thankfully, there are multiple methods of recovery from faulty driver configuration. The tools available are specifically suited to different purposes, and have varying chances of success. Tools that can be used in the event of incorrect driver configuration are listed in below Table
Table Driver Recovery Tools

When a device fails, an error message is usually reported in Device Manager with an exclamation point in a yellow icon next to the device. If you double-click the device (or right-click the device and then click Properties), a dialog box is displayed and any error messages that Device Manager detects are listed. This Device Status has some friendly text with it, but troubleshooting may require that you understand more than the text message delivers. Often, there is a code listed with the text that gives a better idea of how to troubleshoot the problem. These codes and suggested troubleshooting strategies are listed in below Table
Table Device Failure Troubleshooting

Wednesday, September 15, 2010
Configuring Hardware Devices and Drivers
www.syscareinfo.com
Devices may require updated drivers due to changes in the Windows Server 2003 operating system or changes in the way that a vendor programs a device to function. Drivers can be updated through Device Manager.
To minimize the impact of possible problems with a new driver, a feature of Device Manager allows for a return to the previous driver. This rollback feature is accessible through the Properties page of the device.
Occasionally, the automatic resource configuration within Windows Server 2003 is insufficient to accommodate a unique pattern of device use on a particular computer. If a device needs to have static resources (IRQ, I/O Port, DMA, or Memory Range) set, Device Manager can be used to remove the Automatic Settings use in favor of a setting configured by the user/administrator.
Updating Drivers
In Device Manager, most devices can have their drivers updated. The driver update process is a manual one, whether the device is PnP or not, and must be accomplished by an administrator—assuming that the user has not been granted elevated privilege to do so at the console of the local computer.
The process to update a driver is nearly the same as for a device that has been detected properly, but whose driver was not available at installation. After initiating the driver update process for a device from within Device Manager, the Add Hardware Wizard asks for the new driver’s location and the driver is installed. Some core system drivers will require a restart of the computer after installation, but most peripheral devices will not. The Properties page where the update of a driver is started is shown in Below Figure.

Rolling Back Drivers
Occasionally, a new driver will not function properly and cannot be kept in the con-figuration for the device. If the replaced driver was performing properly, then rolling back to the previous driver can be accomplished through Device Manager. Windows Server 2003 automatically backs up the driver that is being replaced through the update driver process, making it available through the Roll Back Driver option. The Properties page where the rollback of a driver can be initiated is shown in below Figure. The contrast between this feature and the Last Known Good Configuration option is discussed in the next topic.
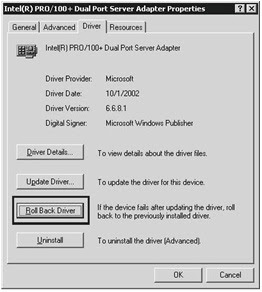
Uninstalling Drivers
Drivers may be uninstalled using Device Manager. The Uninstall Driver process is initiated from the Properties page, as shown in below Figure.

Uninstalling a driver has different effects depending on whether the device was detected and configured through the PnP process. If the device was configured through PnP, then removal of the driver will result in the removal of the device from Device Manager as well. If the driver for the device was added manually, the device will remain in Device Manager, but will not be configured with a driver.
Resource Configuration
Devices and their drivers require system resources to communicate with and process data through the operating system. These resources are configured automatically by Windows Server 2003, sometimes in a shared capacity with other devices within the system. In circumstances where resources must be statically configured, Device Manager allows for some control of the resources assigned for use by a device. If configuration is not available, the resources used by a device and its driver cannot be configured manually. The Resources tab of a device’s Properties page of a manually configurable resource is shown in below Figure.

To configure a resource assignment manually, the Use Automatic Settings check box must first be cleared, then the resources can be set.
Control Panel and Device Configuration
Several devices have Control Panel applications associated with them that allow configuration of hardware devices. The same Device Manager limitations, which are based on user rights, for the installation, updating, or removal of device drivers exist within the Control Panel applications.
Such Properties pages are administered separately through Group Policies, and can be removed from user view and access. This setting is in the User Configuration section of a Group Policy.
www.syscareinfo.com
Devices may require updated drivers due to changes in the Windows Server 2003 operating system or changes in the way that a vendor programs a device to function. Drivers can be updated through Device Manager.
To minimize the impact of possible problems with a new driver, a feature of Device Manager allows for a return to the previous driver. This rollback feature is accessible through the Properties page of the device.
Occasionally, the automatic resource configuration within Windows Server 2003 is insufficient to accommodate a unique pattern of device use on a particular computer. If a device needs to have static resources (IRQ, I/O Port, DMA, or Memory Range) set, Device Manager can be used to remove the Automatic Settings use in favor of a setting configured by the user/administrator.
Updating Drivers
In Device Manager, most devices can have their drivers updated. The driver update process is a manual one, whether the device is PnP or not, and must be accomplished by an administrator—assuming that the user has not been granted elevated privilege to do so at the console of the local computer.
The process to update a driver is nearly the same as for a device that has been detected properly, but whose driver was not available at installation. After initiating the driver update process for a device from within Device Manager, the Add Hardware Wizard asks for the new driver’s location and the driver is installed. Some core system drivers will require a restart of the computer after installation, but most peripheral devices will not. The Properties page where the update of a driver is started is shown in Below Figure.

Occasionally, a new driver will not function properly and cannot be kept in the con-figuration for the device. If the replaced driver was performing properly, then rolling back to the previous driver can be accomplished through Device Manager. Windows Server 2003 automatically backs up the driver that is being replaced through the update driver process, making it available through the Roll Back Driver option. The Properties page where the rollback of a driver can be initiated is shown in below Figure. The contrast between this feature and the Last Known Good Configuration option is discussed in the next topic.

Uninstalling Drivers
Drivers may be uninstalled using Device Manager. The Uninstall Driver process is initiated from the Properties page, as shown in below Figure.

Uninstalling a driver has different effects depending on whether the device was detected and configured through the PnP process. If the device was configured through PnP, then removal of the driver will result in the removal of the device from Device Manager as well. If the driver for the device was added manually, the device will remain in Device Manager, but will not be configured with a driver.
Resource Configuration
Devices and their drivers require system resources to communicate with and process data through the operating system. These resources are configured automatically by Windows Server 2003, sometimes in a shared capacity with other devices within the system. In circumstances where resources must be statically configured, Device Manager allows for some control of the resources assigned for use by a device. If configuration is not available, the resources used by a device and its driver cannot be configured manually. The Resources tab of a device’s Properties page of a manually configurable resource is shown in below Figure.

To configure a resource assignment manually, the Use Automatic Settings check box must first be cleared, then the resources can be set.
Control Panel and Device Configuration
Several devices have Control Panel applications associated with them that allow configuration of hardware devices. The same Device Manager limitations, which are based on user rights, for the installation, updating, or removal of device drivers exist within the Control Panel applications.
Such Properties pages are administered separately through Group Policies, and can be removed from user view and access. This setting is in the User Configuration section of a Group Policy.
www.syscareinfo.com
Monday, August 9, 2010
Installing Hardware Devices and Drivers
Hardware devices communicate with the Windows Server 2003 operating system by means of a software driver. Devices and their drivers, if not installed automatically through Plug and Play, can be configured through the Device Manager.
Devices and Drivers
The easiest way to think about devices and their associated drivers is to divide the devices into two logical categories: Plug-and-Play (PnP) and non-Plug-and-Play (down-level) devices. Most devices manufactured since 1997 are PnP devices, and most PnP drivers for devices are included on the Windows Server 2003 installation CD. When a device is initially detected by Windows Server 2003, and if an acceptable driver is found for that device, the device will be installed and such resources as interrupt requests (IRQs) and direct memory access (DMA) will be allocated for use by the device. The device will then be listed in the categorized listing of devices in Device Manager.
If the PnP driver is not on the Windows Server 2003 Installation CD, you will need the vendor-supplied drivers available when the Windows Server 2003 initially detects, identifies and attempts to install the device. For devices that Windows Server 2003 can identify, you will be prompted for a driver. If the request for the driver is bypassed, Windows Server 2003 will indicate the identified, non-configured device with a yellow warning icon in Device Manager. This icon, as shown in below Figure, is also used if there are duplicate devices on the system or if there are conflicts between the resource demands of drivers, which is extremely rare for newer computer systems and devices.

If a device cannot be identified by Windows Server 2003, no request for a driver will be issued, and the unknown device will be identified with a yellow question mark in Device Manager. For a non-configured or non-identified device, you must install the appropriate driver manually for the device to function properly.
Using Device Manager
Device Manager provides a view, similar to Windows Explorer, of the hardware that is installed on your computer. You can use Device Manager to update the drivers for hardware devices and modify settings related to devices. Device Manager is accessible through the Control Panel by selecting System, the Hardware tab on the Systems Properties dialog box, and then Device Manager to access the Device Manager Properties page, or as part of the Computer Management console, accessible from Administrative Tools. Below Table describes the tasks for which Device Manager can be used.
Table: Device Manager Tasks

A list of devices, drivers, and system configuration can be printed through the Print command on the Action menu in Device Manager or output to a comma-separated-values (CSV) file using the Driverquery command-line utility, the parameters for which are listed in Below Table
 Users, Administrators, and Device Installation
As with most installation tasks, administrators have the ability to install any device and its associated drivers. Users, on the other hand, have very limited ability to install devices on the computer. By default, users can install only PnP devices, with the following considerations:
■ The device driver has a digital signature.
■ No further action is required to install the device, requiring Windows to display a user interface.
■ The device driver is already on the computer.
If any of these conditions is not met, the user cannot install the device unless delegated additional administrative authority.
Driver Signing Options
Device drivers and operating system files included with Windows 2000 or higher have a Microsoft digital signature. The digital signature indicates that a particular driver or file was not altered or overwritten by another program’s installation process. Device drivers provided by vendors outside of Windows 2000 or higher may or may not be signed.
You can control how the computer responds to these unsigned driver files during their installation. These settings are configurable through Control Panel by selecting System, the Hardware tab on the Systems Properties dialog box, and then Driver Signing to access the Driver Signing Options Properties page on an individual computer. The options for unsigned driver installation behavior are:
■ Ignore: To allow all device drivers to be installed on the computer, regardless of whether they have a digital signature. This option is available only if you are logged on as an administrator or as a member of the Administrators group.
■ Warn: To display a warning message, allowing you to allow or deny driver installation, whenever an installation program or Windows attempts to install a device driver without a digital signature. This is the default behavior.
■ Block: To prevent an installation program or Windows from installing device drivers without a digital signature.
Group Policy is an effective tool for simultaneously changing the Driver Signing Options setting on multiple computers. To prohibit a user from changing the setting on his or her computer, you must deny access to the Hardware Properties pages in Control Panel and disable the MMC snap-in for Device Manager in the Computer Management console. These settings will not change the user’s ability to install PnP devices.
Devices and Drivers
The easiest way to think about devices and their associated drivers is to divide the devices into two logical categories: Plug-and-Play (PnP) and non-Plug-and-Play (down-level) devices. Most devices manufactured since 1997 are PnP devices, and most PnP drivers for devices are included on the Windows Server 2003 installation CD. When a device is initially detected by Windows Server 2003, and if an acceptable driver is found for that device, the device will be installed and such resources as interrupt requests (IRQs) and direct memory access (DMA) will be allocated for use by the device. The device will then be listed in the categorized listing of devices in Device Manager.
If the PnP driver is not on the Windows Server 2003 Installation CD, you will need the vendor-supplied drivers available when the Windows Server 2003 initially detects, identifies and attempts to install the device. For devices that Windows Server 2003 can identify, you will be prompted for a driver. If the request for the driver is bypassed, Windows Server 2003 will indicate the identified, non-configured device with a yellow warning icon in Device Manager. This icon, as shown in below Figure, is also used if there are duplicate devices on the system or if there are conflicts between the resource demands of drivers, which is extremely rare for newer computer systems and devices.

If a device cannot be identified by Windows Server 2003, no request for a driver will be issued, and the unknown device will be identified with a yellow question mark in Device Manager. For a non-configured or non-identified device, you must install the appropriate driver manually for the device to function properly.
Using Device Manager
Device Manager provides a view, similar to Windows Explorer, of the hardware that is installed on your computer. You can use Device Manager to update the drivers for hardware devices and modify settings related to devices. Device Manager is accessible through the Control Panel by selecting System, the Hardware tab on the Systems Properties dialog box, and then Device Manager to access the Device Manager Properties page, or as part of the Computer Management console, accessible from Administrative Tools. Below Table describes the tasks for which Device Manager can be used.
Table: Device Manager Tasks

A list of devices, drivers, and system configuration can be printed through the Print command on the Action menu in Device Manager or output to a comma-separated-values (CSV) file using the Driverquery command-line utility, the parameters for which are listed in Below Table

As with most installation tasks, administrators have the ability to install any device and its associated drivers. Users, on the other hand, have very limited ability to install devices on the computer. By default, users can install only PnP devices, with the following considerations:
■ The device driver has a digital signature.
■ No further action is required to install the device, requiring Windows to display a user interface.
■ The device driver is already on the computer.
If any of these conditions is not met, the user cannot install the device unless delegated additional administrative authority.
Driver Signing Options
Device drivers and operating system files included with Windows 2000 or higher have a Microsoft digital signature. The digital signature indicates that a particular driver or file was not altered or overwritten by another program’s installation process. Device drivers provided by vendors outside of Windows 2000 or higher may or may not be signed.
You can control how the computer responds to these unsigned driver files during their installation. These settings are configurable through Control Panel by selecting System, the Hardware tab on the Systems Properties dialog box, and then Driver Signing to access the Driver Signing Options Properties page on an individual computer. The options for unsigned driver installation behavior are:
■ Ignore: To allow all device drivers to be installed on the computer, regardless of whether they have a digital signature. This option is available only if you are logged on as an administrator or as a member of the Administrators group.
■ Warn: To display a warning message, allowing you to allow or deny driver installation, whenever an installation program or Windows attempts to install a device driver without a digital signature. This is the default behavior.
■ Block: To prevent an installation program or Windows from installing device drivers without a digital signature.
Group Policy is an effective tool for simultaneously changing the Driver Signing Options setting on multiple computers. To prohibit a user from changing the setting on his or her computer, you must deny access to the Hardware Properties pages in Control Panel and disable the MMC snap-in for Device Manager in the Computer Management console. These settings will not change the user’s ability to install PnP devices.
Wednesday, July 7, 2010
Administering Software Licenses
The End User License Agreement (EULA) is more than just a nuisance that you must click through to begin installing a new operating system, update, or application. The EULA is a binding contract that gives you the legal right to use a piece of software. In an enterprise environment, managing software licenses is critically important. In this Topic, you will learn to use the licensing tools provided by Windows Server 2003 to register and monitor licenses and compliance.


Obtaining a Client Access License
The server license for Windows Server 2003 enables you to install the operating system on a computer, but you need a Client Access License (CAL) before a user or device is legally authorized to connect to the server. CALs are obtained in bundles, and are often but not always included in the purchase of the operating system. Keep copies of the CAL certificates and your EULAs on file, in the event that your organization is audited for licensing compliance.
You must have a CAL for any connection to a Windows Server 2003 computer that uses server components, which include file and print services or authentication. Very few server applications run so independently that the client/server connection does not require a CAL. The most significant exception to the CAL requirement is unauthenticated access conducted through the Internet. Where there is no exchange of credentials during Internet access, such as users browsing your public Web site, no CAL is required. CALs are therefore not required for Windows Server 2003 Web Edition.
There are two types of CALs: Windows Device CALs, which allow a device to connect to a server regardless of the number of users who may use that device; and Windows User CALs, which allow a user to connect to a server from a number of devices. Windows Device CALs are advantageous for an organization with multiple users per device, such as shift workers. Windows User CALs make most sense for an organization with employees that access the network from multiple or unknown devices.
The number of CALs you require, and how you track those licenses, depends on which client access licensing mode you pursue.
Per-Server Licensing
Per-server licensing requires a User or Device CAL for each concurrent connection. If a server is configured with 1,000 CALs, the 1,001st concurrent connection is denied access. CALs are designated for use on a particular server, so if the same 1,000 users require concurrent connections to a second server, you must purchase another 1,000 CALs.
Per server licensing is advantageous only in limited access scenarios, such as when a subset of your user population accesses a server product on very few servers. Per server licensing is less cost-effective in a situation where multiple users access multiple resources on multiple servers. If you are unsure which licensing mode is appropriate, select Per Server. The license agreement allows a no-cost, one-time, one-way conversion from Per Server to Per Device or Per User licensing when it becomes appropriate to do so.
Per-Device or Per-User Licensing
The Per Device or Per User licensing mode varies from the Per Seat scheme of previous versions of Windows. In this new mode, each device or user that connects to a server requires a CAL, but with that license the device or user can connect to a number of servers in the enterprise. Per User or Per Device mode is generally the mode of choice for distributed computing environments in which multiple users access multiple servers. For example, a developer who uses a laptop and two desktops would require only one Windows User CAL. A fleet of 10 Tablet PCs that are used by 30 shift workers would require only 10 Windows Device CALs.
The total number of CALs equals the number of devices or users, or a mixture thereof, that access servers. CALs can be reassigned under certain, understandable conditions— for example a Windows User CAL can be reassigned from a permanent employee to a temporary employee while the permanent employee is on leave. A Windows Device CAL can be reassigned to a loaner device while a device is being repaired.
Per Server and Per Device or Per User licensing modes are illustrated in below Table.

There are two utilities that will help you track and manage software licensing:
* Licensing in Control Panel: The Control Panel Choose Licensing Mode tool, as shown in below Figure, manages licensing requirements for a single computer running Windows Server 2003. You can use Licensing to add or remove CALs for a server running in per-server mode; to change the licensing mode from Per Server to Per Device or Per User; or to configure licensing replication.

* Licensing in Administrative Tools: The Licensing administrative tool, discussed in the next section, allows you to manage licensing for an enterprise by centralizing the control of licensing and license replication in a site-based model.
Administering Site Licensing
The License Logging service, which runs on each Windows Server 2003 computer, assigns and tracks licenses when server resources are accessed. To ensure compliance, licensing information is replicated to a centralized licensing database on a server in the site. This server is called the site license server. A site administrator, or an administrator for the site license server, can then use the Microsoft Licensing tool in Administrative Tools program group to view and manage licensing for the entire site. This new license tracking and management capability incorporates licenses not just for file and print services, but for IIS, for Terminal Services, and for BackOffice products such as Exchange or SQL Server.
The Site License Server
The site license server is typically the first domain controller created in a site. To find out what server is the license server for a site, open Active Directory Sites And Services, expand to select the Site node then right-click Licensing Site Settings and choose Properties. The current site license server is displayed, as shown in below Figure

To assign the site license server role to another server or domain controller, click Change and select the desired computer. To retain the licensing history for your enterprise, you must immediately after transferring the role stop the License Logging service on the new license server, then copy the following files from the old to the new licensing server:
* %Systemroot%\System32\Cpl.cfg contains the purchase history for your organization.
* %Systemroot%\Lls\Llsuser.lls contains user information about the number of connections.
* %Systemroot%\Lls\Llsmap.lls contains license group information.
After all files have been copied, restart the License Logging service.
Administering Site Licenses
Once you have identified the site license server for a site, you can view the licensing information on that server opening Licensing from the Administrative Tools program group. The Server Browser tab in Licensing (as shown in below Figure) enables you to manage licensing for an entire site or enterprise.

The Server Browser page of Licensing allows you to manage any server in any site or domain for which you have administrative authority. You can locate a server and, by right-clicking it and choosing Properties, manage that server’s licenses. For each server product installed on that server, you can add or remove per-server licenses. You can also, where appropriate, convert the licensing mode. Remember that per server licensing mode issues a license when a user connects to the server product. When a user disconnects from the server product, the License Logging service makes the license available to another user.
The server properties also allow you to configure license replication, which can be set on a server using its Licensing properties in Control Panel. By default, license information is replicated from a server’s License Logging Service to the site license server every 24 hours, and the system automatically staggers replication to avoid burdening the site licensing server. If you want to control replication schedules or frequency, you must manually vary the Start At time and Start Every frequency of each server replicating to a particular site license server.
To manage Per Device or Per User licensing, click Licensing from the Administrative Tools program group, then choose the New License command from the License menu. In the New Client Access License dialog box, select the server product and the number of licenses purchased. Licenses are added to the pool of licenses. As devices or users connect to the product anywhere in the site, they are allocated licenses from the pool, with one license for each device or user. After a pool of licenses is depleted, license violations occur when additional devices or users access the product.
The Purchase History tab in Licensing (as shown in below Figure) provides a historical overview of licenses purchased for a site, as well as the quantity, date, and administrator associated with the addition or removal of licenses.

To view cumulative information about licensing and compliance, click the Products View tab. This tab shows how many licenses have been purchased and allocated to users or devices (in Per Device or Per User mode) or the number of licenses purchased for all servers in the site and the peak connections reached to date (in Per Server mode). You can also determine compliance using the licensing status symbols shown in below Table.
| Symbol Licensing Status |
 The product is in compliance with legal licensing requirements. The number of connections is less than the number of licenses purchased. The product is not in compliance with legal licensing requirements. The number of connections exceeds the number of licenses purchased. The product has reached the legal limit. The number of connections equals the number of licenses purchased. If additional devices or users will connect to the server product, you must purchase and log new licenses |
License Groups
Per Device or Per User licensing requires one CAL for each device. However, the License Logging service assigns and tracks licenses by user name. When multiple users share one or more devices, you must create license groups, or else licenses will be consumed too rapidly.
A license group is a collection of users who collectively share one or more CALs. When a user connects to the server product, the License Logging service tracks the user by name, but assigns a CAL from the allocation assigned to the license group. The concept is easiest to understand with examples:
*10 users share a single handheld device for taking inventory. A license group is created with the 10 users as members. The license group is assigned one CAL, representing the single device they share.
*100 students occasionally use a computer lab with 10 computers. A license group is created with the 100 students as members, and is allocated 10 CALs.
To create a license group, click the Options menu and, from the Advanced menu, choose New License Group. Enter the group name and allocate one license for each client device used to access the server. The number of licenses allocated to a group should correspond to the number of devices used by members of the group.
Subscribe to:
Posts (Atom)


